Discussion Forum - Northstar Chevelle Club

Members Login
Username 
 
Password 
    Remember Me  
Post Info TOPIC: "Little Red Wagon"


2K+ Club

Status: Offline
Posts: 2791
Date:
"Little Red Wagon"
Permalink  


In my continuing theme of building models from my youth, I've taken on another project.

Bill "Maverick" Golden's "Little Red Wagon"

(There's a neat back-story to this... When I was a little kid, Mom & I would go to our family car dealership on Saturdays for lunch. My Dad would bring in either buckets of Kentucky Fried Chicken, or pounds of cold-cuts/deli, and feed the staff & customers. One Saturday this BRIGHT red car-hauler rig pulls into the dealership, and it's none-other than Bill Golden and the "Little Red Wagon" on his way to Union Grove Dragway!! I guess they were lost, and needed directions. I really didn't know the significance of this visit - I was 6 - but there was this neato Drag Truck on a hauler!... made my day.)

Anyway...

This kit is a bear. LOTS of poorly fitting parts, and a TON of bodywork. It has opening doors and tailgate, and is one of those "3 in 1" kits. You can build it stock, modified, or as the Little Red Wagon. It has conversion parts for all three, and the filler panels for the mid-engine "Wagon".

I lost count of how many hours of filling & sanding to get the seams filled and gaps right/gone.


Attachments
__________________


John D. - St. Louis Park, MN.

1965 El Camino - LT-1, 4L60e, 4wh discs, SC&C susp.
2013 F-150 Platinum - Twin Turbo 3.5

2018 Factory Five MkIV Roadster build thread


2K+ Club

Status: Offline
Posts: 2791
Date:
Permalink  
 

Some more pics:


Attachments
__________________


John D. - St. Louis Park, MN.

1965 El Camino - LT-1, 4L60e, 4wh discs, SC&C susp.
2013 F-150 Platinum - Twin Turbo 3.5

2018 Factory Five MkIV Roadster build thread


President

Status: Offline
Posts: 7328
Date:
Permalink  
 

It'll be interesting to see the detail on the engine, when you get to that.

__________________

Mitch D.   River Falls, WI

Lifetime member of the "Cars apart Club"

1966 Chevelle SS 396 M20

1970 Chevelle SS 396 M20

1967 Camaro SS/RS 350 M20


2K+ Club

Status: Offline
Posts: 2791
Date:
Permalink  
 

Been doing some painting and test panels.

I decided to build the "LRW" in its later years, when it was painted in more of a deep-red/burgundy "candy" color. Difficulty is that there aren't too many choices available (in modelling paint) for candy/transparent colors... and, I've never done a model in a basecoat/topcoat paint scheme.

I chose AlClad's Ruby Red. They strongly recommend applying their topcoats over their own Aluminum/Chrome basecoat... So I bought a jar of each, and did a few test-panels on an old kit I wasn't going to build. Didn't like the results. Color was too "pinky", with shades of purple.
Regroup.
Shot the other side with basecoats of Testor's gold enamel, then Model Masters (Testors) "Metalizer" non-buff Brass. (Metalizer recommends topcoating with their sealer. I did this on 1/2 of the area. It tends to dull the effect).

Shot the AlClad red over the gold/brass... YES!

The final result was 3 coats. Two full-coverage (but "mist" coats) 10 minutes apart, then a final "wet" coat. This stuff flowed out really nice, I'll have very little cleanup & buffing after the decals and clear are on!
(The interior, jambs and underside were the sacrificial lambs. As in painting a real car, I did those first, then installed the doors & tailgate for the final color coats on the exterior)


Attachments
__________________


John D. - St. Louis Park, MN.

1965 El Camino - LT-1, 4L60e, 4wh discs, SC&C susp.
2013 F-150 Platinum - Twin Turbo 3.5

2018 Factory Five MkIV Roadster build thread


2K+ Club

Status: Offline
Posts: 2791
Date:
Permalink  
 

Did some work on the engine and wheels.

The front suspension is chromed on the real LRW, but not in the kit. "Foiling" isn't really an option, as there are too many angles and curves. Might need to try AlClad's chrome paint system...

Engine detail is pretty basic. Added plug wires (in the correct B/RB firing order btw), and I'll add fuel delivery once the tank is in the bed.

The wheels were a bytch. The kit is designed for the box-stock A100 truck - with 4wh drums and steelies. The LRW has NO front brakes (just spindles & hubs) so adapting the kit's wheel mounting to accurate means a lot of fabrication. The kit also features "steerable front wheels", which also make assembly "clunky". My LRW won't have steerable fronts... they're locked.


Attachments
__________________


John D. - St. Louis Park, MN.

1965 El Camino - LT-1, 4L60e, 4wh discs, SC&C susp.
2013 F-150 Platinum - Twin Turbo 3.5

2018 Factory Five MkIV Roadster build thread


President

Status: Offline
Posts: 7328
Date:
RE: "Little Red Wagon"
Permalink  


That is some shiny paint !! I can see the plug wires reflected in it.


__________________

Mitch D.   River Falls, WI

Lifetime member of the "Cars apart Club"

1966 Chevelle SS 396 M20

1970 Chevelle SS 396 M20

1967 Camaro SS/RS 350 M20


2K+ Club

Status: Offline
Posts: 2791
Date:
Permalink  
 

Bit the bullet and went with AlClad's Chrome paint. Not for the faint of heart or light of wallet.

It's a two-part system.
What you want to "chrome" is 1st finished to perfection, then sprayed with their gloss black (??!!). Allow to dry at least 24 hours.
Then you come back and spray 2 to 3 very light wet - but "mist" - coats of the chrome paint over the black...

It's amazing. The "chrome" must be translucent or something. The high-gloss properties of the black base-coat are imparted on or through the chrome/silver topcoat, and it really looks like chromed plastic.

As for faint of wallet (sit down), in 1oz. bottles the black is $4.45, and the chrome is $8.85. (comes out to $1135/gallon for the chrome!!). Between the candy red and the chrome, I've got more $$$ in paint than the cost of the kit... Granted, I've got enough of all to do at least 3 more kits, but OUCH!... especially when you WASTE nearly as much as sprayed cleaning out what's left in the airbrush!


Attachments
__________________


John D. - St. Louis Park, MN.

1965 El Camino - LT-1, 4L60e, 4wh discs, SC&C susp.
2013 F-150 Platinum - Twin Turbo 3.5

2018 Factory Five MkIV Roadster build thread


2K+ Club

Status: Offline
Posts: 2444
Date:
Permalink  
 

John D wrote:

Been doing some painting and test panels.

I chose AlClad's Ruby Red. They strongly recommend applying their topcoats over their own Aluminum/Chrome basecoat... So I bought a jar of each, and did a few test-panels on an old kit I wasn't going to build. Didn't like the results. Color was too "pinky", with shades of purple.
Regroup.


The Ruby Red color on the new Fords is a sharp color.

Sweet job with your expected excellence!


__________________

Kevin

Northwestern Ohio


President

Status: Offline
Posts: 7328
Date:
Permalink  
 

COOL !! I can see why the axle needs to be chrome. The second to last pic is the normal "stance" for that wagon. You'll need to build a display with it in a wheel stand.

__________________

Mitch D.   River Falls, WI

Lifetime member of the "Cars apart Club"

1966 Chevelle SS 396 M20

1970 Chevelle SS 396 M20

1967 Camaro SS/RS 350 M20


2K+ Club

Status: Offline
Posts: 2791
Date:
Permalink  
 

This morning was the "point of no return". Time for the decals on the LRW. Gotta cover up my beautiful paint job...

It actually went well. I use two products just for model decals - MicroScale Industries "Micro-Set" and "Micro-Sol".

MicroSet is a wetting & bonding solution, that allows you to slide the decal around much longer than with just the plain water used to free it from the sheet. It also softens the decal slightly to allow it to conform to gentle curves.
MicroSol is a pretty aggressive solution that nearly dissolves the carrier film. It's scary stuff to watch. You get the decal where you want it with the Micro-Set, blot it, etc. and let it dry a bit. Then GENTLY over coat it with the Micro-Sol. Within a few minutes your perfectly placed decal will wrinkle up!! Then as the solution dries, it just sucks into all the nooks & crannies that it would never had adhered to before.
The nose of the LRW is an example. The word "Dodge" (which I should have sanded off clonk 
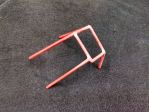
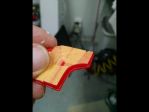
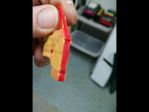
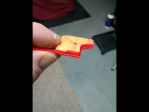
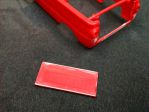
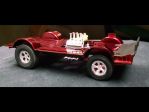
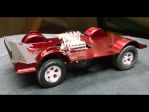
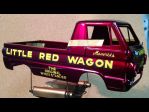
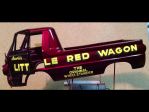
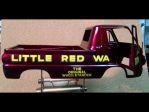
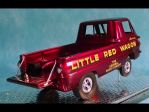
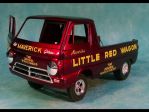
too late now...) is raised. There was NO way the decal would have settled in without the MicroSol.
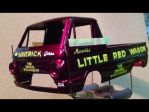
Next step is thoroughly clean the body, and shoot a few coats of clear. This will bond the decals to the paint, give them the correct "painted on" gloss, and get rid of the carrier film edges.


Attachments
__________________


John D. - St. Louis Park, MN.

1965 El Camino - LT-1, 4L60e, 4wh discs, SC&C susp.
2013 F-150 Platinum - Twin Turbo 3.5

2018 Factory Five MkIV Roadster build thread


2K+ Club

Status: Offline
Posts: 2791
Date:
RE: "Little Red Wagon"
Permalink  


The "Little Red Wagon" is done.

This was a fun build. By no means a "beginner-level" kit.
The chassis and engine are pretty straightforward and standard assembly and build practice. The rest of the kit is somewhat of a compromise... it's a "3 in 1", so the parts are meant to work with all versions. This translates into a reasonably accurate model of the OEM truck, but a representation of the LRW.

The body is another story... there are many ill-fitting parts, and modifications needed to make them fit, work, and look good.
Shortlist:
- Lots of mold-seams and edge-flashing to sand/scrape off
- Poor mold joints. Required many filler & sanding sessions
- The multi-piece door skins and tailgate require a LOT of sanding/grinding/cutting to get them CLOSE to fitting together
- After fitting & glue-up, the door skins & tailgate required many filler & sanding sessions
- Building the LRW version required cutting out the bed floor (scribed), and installing a filler panel - which needed a lot of filler & sanding time.
- The molded "rubber" tires are really bad. The mold seam is terrible, and each tire needed a LOT of work to look decent.

Hanging the doors... Probably the most difficult part of the build.
- The hinges are not molded into the body or outer door skins. They are 4 separate pieces per door (like the OEM/prototype). The body 1/2 of the hinge has a molded hole, the door 1/2 has a molded-in pin (about 3/32" in dia.) that is totally useless.
- I wound up cutting off the plastic hinge pin, then clamping each respective hinge assy together in the closed position.
- Using the molded-in hole in the body half of the hinge as a guide, I drilled through the door half with a #68 (.032) drill.
- When each set of hinges (for a door) was done, a length of .030 brass rod was slid through the parts. (you can see this in some of the pics)
- The door assemblies were taped in place into the body shell, and the hinge assemblies slid into the slots on the door & body.
- When everything with the hinges and body was square/level/perpendicular a dot of ACC (crazy-glue) was applied to the door & body hinge sockets.
- The brass rod hinge pin was VERY CAREFULLY slid out of the hinges
- The hinge parts were final glued in place on the body and doors, and more filler/sand/filler/sand sessions.
- After final paint the excess rod was snipped off, and a dot of ACC applied to the body half to secure the pin(s)
(The tailgate was a similar story, but just pinned in place permanently)

Paint:
All paint-work on the LRW was done with my 20+ year old Paasche model "H" single action airbrush. (This is the "old reliable" of airbrushes.)
In total there are 10 coats of paint on the model:
- 3 coats Testors "Metalizer" brass base-coat
- 3 coats AlClad "Ruby Red" candy top-coat
- 4 coats Testors "Gloss-Cote" clear lacquer
(and yes, crazy as it sounds... an application and buff of Meguire's carnauba wax)


The end result winds up being "my tribute" to the LRW. The paint is from the later years of it's campaign, the engine, tires & wheels, and decals (kit supplied) are from the earlier years, but it's still a neat representation of an iconic exhibition drag vehicle.


Attachments
__________________


John D. - St. Louis Park, MN.

1965 El Camino - LT-1, 4L60e, 4wh discs, SC&C susp.
2013 F-150 Platinum - Twin Turbo 3.5

2018 Factory Five MkIV Roadster build thread


President

Status: Offline
Posts: 7328
Date:
Permalink  
 

Very Nice !!!


__________________

Mitch D.   River Falls, WI

Lifetime member of the "Cars apart Club"

1966 Chevelle SS 396 M20

1970 Chevelle SS 396 M20

1967 Camaro SS/RS 350 M20


Active Member

Status: Offline
Posts: 470
Date:
RE:
Permalink  


That is amazing! You have a real talent.


__________________

Larry L.

Coon Rapids


3K+ Club

Status: Offline
Posts: 4731
Date:
RE: "Little Red Wagon"
Permalink  


Looks great John!  tiphat

Now you need a full scale 'real' muscle car project.  After all, it's the same skills, just a bigger scale... right?  stirpot


__________________

Stan S.-Twin Cities 'South Metro'

1972 Malibu Convertible 2nd time around 

2001 Mustang GT Convertible 

Forum influenced terms: 'Link Paste', 'Stanitized', & 'Revolving garage door...' 


2K+ Club

Status: Offline
Posts: 2791
Date:
RE:
Permalink  


If the $$ invested at 1:25th scale would magically multiply to 1:1 scale it would be a possibility!!


__________________


John D. - St. Louis Park, MN.

1965 El Camino - LT-1, 4L60e, 4wh discs, SC&C susp.
2013 F-150 Platinum - Twin Turbo 3.5

2018 Factory Five MkIV Roadster build thread


President

Status: Offline
Posts: 7328
Date:
RE: "Little Red Wagon"
Permalink  


John D wrote:

If the $$ invested at 1:25th scale would magically multiply to 1:1 scale it would be a possibility!!


 If you get bored on a Saturday, I can possibly provide the opportunity to practice on a full scale model...laughing

AND at no cost to you...thumbsup


__________________

Mitch D.   River Falls, WI

Lifetime member of the "Cars apart Club"

1966 Chevelle SS 396 M20

1970 Chevelle SS 396 M20

1967 Camaro SS/RS 350 M20


Active Member

Status: Offline
Posts: 473
Date:
Permalink  
 

Nice job John. The paint turned out amazing!


__________________

Chris S.

Oak Grove

'68 Malibu (His)

'68 442 (Hers)

Page 1 of 1  sorted by
 
Quick Reply

Please log in to post quick replies.

Chatbox
Please log in to join the chat!