Discussion Forum - Northstar Chevelle Club

Members Login
Username 
 
Password 
    Remember Me  
Post Info TOPIC: 700r4 checking my answers


Webmaster

Status: Offline
Posts: 158
Date:
700r4 checking my answers
Permalink  


Wahoo!!! transmission is in! took two days to get it done, but it is in now! what better way to spend fathers day than with the old man gettin dirty under the car! Now if you guys could help me on some nitty gritty details. Of course it has to come down to the tv cable, I thought I had it all figured it, all my research down, buuuuut of course something had to go wrong. Here is a picture of what I have for a carb, its essentially an edelbrock 1903

ry%3D480

 Here is a picture of what I had ordered, and what tci auto had told me that I needed for my carb, will be calling them tomorrow to tell them that they were wrong!!!

angry


ry%3D480

Sooooo now what? From what I have read, that bottom stud was meant for a t.h. 350 for the kickdown cable, and not a tv cable? I can't find any other "geometry corrector" cable kits. Does anyone know of another kit?  (I was trying to avoid the tv made ez kit, was going to go for the nice one when the tranny gets rebuilt and its a final application) Can I use that bottom stud? 

Everything was going sooooo well right up until the end..(besides forgetting to put the filler tube in and having to drop the transmission so it would fit between the tunnel and firewall), but everything was going sooo well and now its like well crap, now what. Any help or advice would be great! thanks guys!


-- Edited by cooz65 on Sunday 16th of June 2013 09:44:11 PM

__________________

1965 Elky, 350-200R4

1970 Mercury Colony Park 

1952 Allis Chalmers WD

"It's not about how fast you go, it's about how fast you get going"

~ Steven ~ Stacy, MN


1K+ Club

Status: Offline
Posts: 1724
Date:
Permalink  
 

My guess is TCI thought you had a 1406 style edelbrock carb not a quadrajet replacement. So does you Q-jet have the stud on the lower back part of the throttle linkage like your picture shows? If it does you hook the TV cable right to that. If it does not then just buy a replacement stud like that one that bolts into that spot.


__________________

Chris P
East Central, Mn

66 Chevelle 300 deluxe


Webmaster

Status: Offline
Posts: 158
Date:
Permalink  
 

yes it does that that stud on the lower part, but heres the thing, when I would attach it, I could feel the plunger already being pushed in, instead of just barely being touched, and then the plunger would bottom out before I was at WOT. I have the cable adjusted as far out as it will go. I mean it's only off maybe, 1/8"in each direction, but none the less, I can't get to WOT with the plunger buried and at idle with the plunger just engaging. Is there a fix for this? I stumbled across this website, http://purplesagetradingpost.com/sumner/techinfo/700R4p1.html which shows how he cut and rewelded the arm to fit those angles? Sound good?


__________________

1965 Elky, 350-200R4

1970 Mercury Colony Park 

1952 Allis Chalmers WD

"It's not about how fast you go, it's about how fast you get going"

~ Steven ~ Stacy, MN


Super Poster

Status: Offline
Posts: 596
Date:
Permalink  
 

When I put the the 700r4 in mine I had a Holley 4150 carb. I bought a bolt on arm like the TCI one you show. It would bolt to my carb but I still ended up cutting and rewelding the button on it to get it to work like I wanted. If you can cut and reweld the arm like they show it should work.


__________________

Steve S. - Fountain, MN


1972 Chevelle - 383 stroked LS1/4L60E - SOLD!


1K+ Club

Status: Offline
Posts: 1724
Date:
Permalink  
 

Option B here is the line pressure table from the service manual. Borrow a gauge and try to adjust it accordingly. Sorry it is upside down but you'll figure it out.


-- Edited by 67ss on Wednesday 19th of June 2013 01:55:54 PM

Attachments
__________________

Chris P
East Central, Mn

66 Chevelle 300 deluxe


1K+ Club

Status: Offline
Posts: 1724
Date:
Permalink  
 

I think before I would butcher up the linkage you might bring the car to John at Master and let him get it adjusted for you.


__________________

Chris P
East Central, Mn

66 Chevelle 300 deluxe


Webmaster

Status: Offline
Posts: 158
Date:
Permalink  
 

Thanks for the advice. John is a little bit of a drive for me, but I am definitely going to give him a call after work and see what words of encouragement he has to offer before I start cutting. It seems kind of odd to me that GM didn't get this right in the first place. For such a critical system it just doesn't seem like guys should have had this much trouble with it had it been good to go in the first place. 


__________________

1965 Elky, 350-200R4

1970 Mercury Colony Park 

1952 Allis Chalmers WD

"It's not about how fast you go, it's about how fast you get going"

~ Steven ~ Stacy, MN


Super Poster

Status: Offline
Posts: 596
Date:
Permalink  
 

Getting John's advise is a good idea.  I would guess that the button on your carb was intended for a kick down cable like a turbo 350 would have.  The kick down cable is more like an on/off switch where your TV cable adjustment is more critical because it varies with the throttle position.


__________________

Steve S. - Fountain, MN


1972 Chevelle - 383 stroked LS1/4L60E - SOLD!


President

Status: Offline
Posts: 7328
Date:
Permalink  
 

There should be a mounting point for the cable housing at the carb. In my limited opinion, that plate should move forward to allow the cable to extend further instead of cutting an arm and moving it back. If the cable is too short to get more travel, the cable may be wrong for the application. I have  the bowtie kit for my '38 and will see what adjustment there is for the housing mount and cable length.


__________________

Mitch D.   River Falls, WI

Lifetime member of the "Cars apart Club"

1966 Chevelle SS 396 M20

1970 Chevelle SS 396 M20

1967 Camaro SS/RS 350 M20


1K+ Club

Status: Offline
Posts: 1724
Date:
Permalink  
 

Lost in the 60s wrote:

There should be a mounting point for the cable housing at the carb. In my limited opinion, that plate should move forward to allow the cable to extend further instead of cutting an arm and moving it back. If the cable is too short to get more travel, the cable may be wrong for the application. I have  the bowtie kit for my '38 and will see what adjustment there is for the housing mount and cable length.


 That is exactly what I did to the holding bracket that is on the 55. I cut it welded two screws to it with nuts on the bottom. So I am able to slide the whole bracket forward or backwards on itself to fine tune as needed.


__________________

Chris P
East Central, Mn

66 Chevelle 300 deluxe


Active Member

Status: Offline
Posts: 306
Date:
Permalink  
 

It's not the cable, they're all the same. The problem is how it's mounted. If it's connected closer to the carb pivot point it will have a shorter pull, farther away, it'll have a longer pull.

GM did get it right. The problem is, you're not using GM parts, you're using TCI parts. It appears TCI didn't get it right. I'm sure GM made cars with a Quadrajet carb and a 700R4 trans. Maybe you could just get the GM carb linkage and cable mounting bracket for that application and it would be a simple bolt on.


__________________

1964 Malibu Convert
"Nitrous is for guys who can't build motors"

www.worldracingleague.org 

www.facebook.com/wellsmafiaracing


Secretary

Status: Offline
Posts: 2941
Date:
Permalink  
 

67ss wrote:

 That is exactly what I did to the holding bracket that is on the 55. I cut it welded two screws to it with nuts on the bottom. So I am able to slide the whole bracket forward or backwards on itself to fine tune as needed.


 You did this on mine on the original carb setup too.


__________________

Bryan-NW 'burbs
1972 Malibu
Vaguely stock appearing, and the opposite of restored.
1999 std bore 5.7, Vortec heads, Holley Stealth Ram, GM cam
700R4, Viking coilovers, 12 bolt 4.10 posi, and a whole bunch more


3K+ Club

Status: Offline
Posts: 4731
Date:
Permalink  
 

bowtie wrote:
67ss wrote:

 That is exactly what I did to the holding bracket that is on the 55. I cut it welded two screws to it with nuts on the bottom. So I am able to slide the whole bracket forward or backwards on itself to fine tune as needed.


 You did this on mine on the original carb setup too.


 worthless

C'mon guys... help the kid out here.  Any pics you can post?


__________________

Stan S.-Twin Cities 'South Metro'

1972 Malibu Convertible 2nd time around 

2001 Mustang GT Convertible 

Forum influenced terms: 'Link Paste', 'Stanitized', & 'Revolving garage door...' 


1K+ Club

Status: Offline
Posts: 1724
Date:
Permalink  
 

I cannot seem to post pictures anymore. It just sits and loads but never finishes.


__________________

Chris P
East Central, Mn

66 Chevelle 300 deluxe


President

Status: Offline
Posts: 7328
Date:
Permalink  
 

My Bowtie kit is for a Lokar cable and has a fancy adjustable mechanism to mount on the throttle arm. Not gonna be appicable to a regular TV end.


__________________

Mitch D.   River Falls, WI

Lifetime member of the "Cars apart Club"

1966 Chevelle SS 396 M20

1970 Chevelle SS 396 M20

1967 Camaro SS/RS 350 M20


Secretary

Status: Offline
Posts: 2941
Date:
Permalink  
 

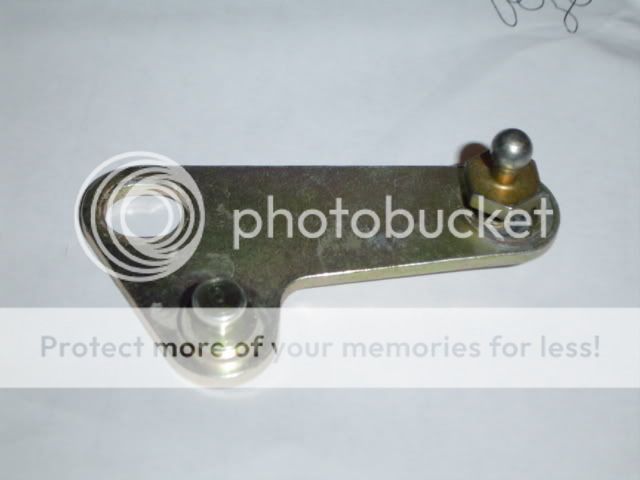
TV cable corrector lever:

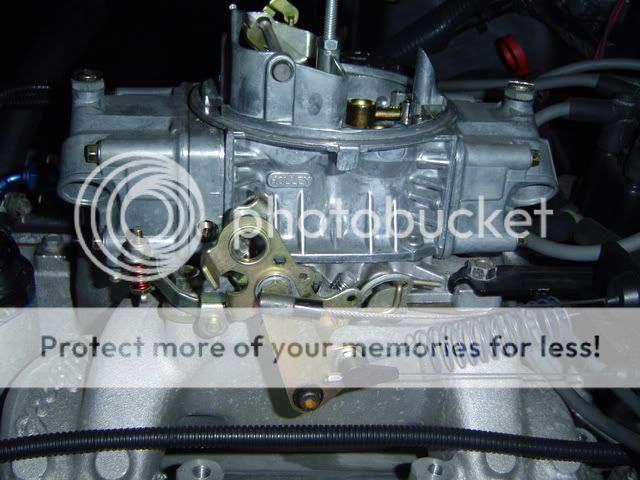
installed:

The bracket is 2 pieces, 67SS slotted one and used screws to help hold it firm until it was correct, then tacked it into place and added paint. Had to get a little creative. The original bracket was some sort of universal one I think and part of it was cut off and discarded too.


-- Edited by bowtie on Thursday 20th of June 2013 08:44:35 PM

__________________

Bryan-NW 'burbs
1972 Malibu
Vaguely stock appearing, and the opposite of restored.
1999 std bore 5.7, Vortec heads, Holley Stealth Ram, GM cam
700R4, Viking coilovers, 12 bolt 4.10 posi, and a whole bunch more


Webmaster

Status: Offline
Posts: 158
Date:
Permalink  
 

Thanks for the pictures Bowtie! I talked with this guy named cliff, from http://cliffshighperformance.com/, and dang what a guy! Knew everything there was to know about quadrajets and he talked and bs.ed with me for about 15 mins just talking cars. I would by his rebuild kit and other parts from him just from the willing to help standpoint. He said that the geometry between the kickdown stud and a tv stud were very close and that if I use that bottom stud I would be in the ball park. I like the idea of slotting that bracket to give a little bit more play in the system. I will be on my way home tonight after work and will give it a try. Does anyone have a transmission pressure gauge? I called my local napa and they didn't have one, or any ideas of where I could rent one from? Thanks! 


__________________

1965 Elky, 350-200R4

1970 Mercury Colony Park 

1952 Allis Chalmers WD

"It's not about how fast you go, it's about how fast you get going"

~ Steven ~ Stacy, MN


1K+ Club

Status: Offline
Posts: 1724
Date:
Permalink  
 

I wonder if orielly's in their loaner tools might have an oil pressure gauge tester that would go high enough. If not PM me and I might be able to help you out.


__________________

Chris P
East Central, Mn

66 Chevelle 300 deluxe


Webmaster

Status: Offline
Posts: 158
Date:
Permalink  
 

Alright so tonight I took some measurements of my arm and it looks like my angles are very similar to GM's 

http://www.countywidetransmissions.com/images/cadjust.pdf


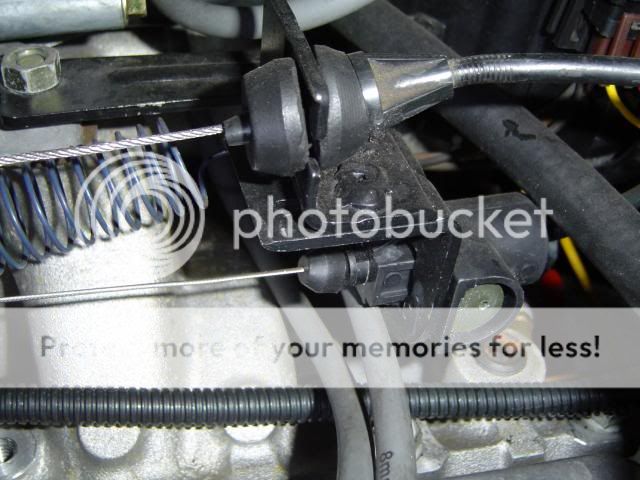
Here are some pictures of the plunger, with it all the way out, it is just barely touching the plunger, just has it pushed in a hair, 

?ui=2&ik=7a8bfe5d8d&view=att&th=13f69a8a2ecf9f9e&attid=0.1&disp=inline&realattid=1438507042741420032-local0&safe=1&zw&saduie=AG9B_P9apXIdhQrELGyZJ21DaAWa&sadet=1371867347254&sads=O5Tv85z7eXjcJhKHeX1g9y-BWmk

and here is a picture with it buried 

?ui=2&ik=7a8bfe5d8d&view=att&th=13f69a7d279d9245&attid=0.1&disp=inline&realattid=1438506977806254080-local0&safe=1&zw&saduie=AG9B_P9apXIdhQrELGyZJ21DaAWa&sadet=1371867399471&sads=iFW_J7a5hia0FaCvqTnvyow4wwQ

At WOT the plunger is right up the edge of the radius, you can push it in that hair more, but is it supposed to flush? or how I have it? If I burry the plunger, it will throw off my idle setting and vise versa. 

Also, is an external tranny cooler supposed to be used with the radiator cooling lines, so it would run through the radiator and then through an external cooler, or are those external coolers intended to be run by themselves. 

Thanks for the help!


__________________

1965 Elky, 350-200R4

1970 Mercury Colony Park 

1952 Allis Chalmers WD

"It's not about how fast you go, it's about how fast you get going"

~ Steven ~ Stacy, MN


Webmaster

Status: Offline
Posts: 158
Date:
Permalink  
 

sorry for the huge pictures.......

__________________

1965 Elky, 350-200R4

1970 Mercury Colony Park 

1952 Allis Chalmers WD

"It's not about how fast you go, it's about how fast you get going"

~ Steven ~ Stacy, MN


Webmaster

Status: Offline
Posts: 158
Date:
Permalink  
 

Went out for the maiden voyage yesterday! Everything seemed to work great except a few minor things. I'm kicking myself for not replacing the gasket around the tv cable, got a real small leak there. and the tranny seemed to shift really nice and smooth, not a problem, but it would shift into OD at 30 mph. If I was accelerating up to cruising speed it would shift just fine, but on the back roads, it would seem like it would go from 2nd gear to 4th and not hold itself in third. I could shift it down to third, but as soon as i put it in od it would go to fourth? This just seems way to soon, buuut I was very pleased to see the torque converter lock up at at 60 mph I was only spinning about 1800 rpms! What a relief!

__________________

1965 Elky, 350-200R4

1970 Mercury Colony Park 

1952 Allis Chalmers WD

"It's not about how fast you go, it's about how fast you get going"

~ Steven ~ Stacy, MN


President

Status: Offline
Posts: 7328
Date:
Permalink  
 

Sounds like you are very close on the adjustment. Good to see you are working thru all the issues that arise with these type of swaps. Many people give up. I can't help with the details as I haven't installed my 200r4 yet but I like your "tenacity'. Keep at it and you'll get it !!

__________________

Mitch D.   River Falls, WI

Lifetime member of the "Cars apart Club"

1966 Chevelle SS 396 M20

1970 Chevelle SS 396 M20

1967 Camaro SS/RS 350 M20


Webmaster

Status: Offline
Posts: 158
Date:
Permalink  
 

Just wanted to say THANK YOU to everyone that helped out! everything is in place and working properly (or so it seems). See ya guys next week at car craft!


__________________

1965 Elky, 350-200R4

1970 Mercury Colony Park 

1952 Allis Chalmers WD

"It's not about how fast you go, it's about how fast you get going"

~ Steven ~ Stacy, MN


3K+ Club

Status: Offline
Posts: 4731
Date:
Permalink  
 

cooz65 wrote:

Just wanted to say THANK YOU to everyone that helped out! everything is in place and working properly (or so it seems). See ya guys next week at car craft!


 That's great Steven!  CC will be a blast, and you will have fun hanging out on Chevelle Row!  beers


__________________

Stan S.-Twin Cities 'South Metro'

1972 Malibu Convertible 2nd time around 

2001 Mustang GT Convertible 

Forum influenced terms: 'Link Paste', 'Stanitized', & 'Revolving garage door...' 


Secretary

Status: Offline
Posts: 2941
Date:
Permalink  
 

One of the coolest things about Car Craft with the club is there we all have different interests when there. Some guys are into the RSE stuff, some are into resto cars, some are just there to be there, some are there to be seen and see all their friends. If you don't know anyone in the club, you will by the end of the first day, just follow along with a coupld guys when they go looking at stuff.

__________________

Bryan-NW 'burbs
1972 Malibu
Vaguely stock appearing, and the opposite of restored.
1999 std bore 5.7, Vortec heads, Holley Stealth Ram, GM cam
700R4, Viking coilovers, 12 bolt 4.10 posi, and a whole bunch more


2K+ Club

Status: Offline
Posts: 2791
Date:
Permalink  
 

Cooz - check your PM's

__________________


John D. - St. Louis Park, MN.

1965 El Camino - LT-1, 4L60e, 4wh discs, SC&C susp.
2013 F-150 Platinum - Twin Turbo 3.5

2018 Factory Five MkIV Roadster build thread


2K+ Club

Status: Offline
Posts: 2791
Date:
Permalink  


Oh, and as far as your cooler question - you'll get as many replies/opinions as there are people... so here's my take on the subject, based upon personal experience and input from professional transmission rebuilders.

IMO the "correct" method is to run the output line (hot fluid) into a "radiator / fluid to fluid" cooler 1st, then the output of the fluid to fluid cooler into an auxiliary "fluid to air" cooler, then back to the transmission.

Here's the theory:
Fluid to Fluid will stabilize (and/or equalize) the temperature of the fluid being cooled MUCH faster than fluid to air. So, if your trans fluid is hotter than engine coolant it will bring it down to 200 or so degrees. Inversely, it will bring cold trans fluid up to temp and/or help engine coolant get up to temp (faster engine warm up).
(Think about it - when welding or grinding a part do you let it sit on the bench for 1/2 hour, or dunk it in a bucket of water and touch it in 20 seconds?)

Then, running it to the air to air will further cool the trans fluid down (below 200 or so) and back to the transmission where it will equalize with the hotter fluid in the unit or pan.

2cents


__________________


John D. - St. Louis Park, MN.

1965 El Camino - LT-1, 4L60e, 4wh discs, SC&C susp.
2013 F-150 Platinum - Twin Turbo 3.5

2018 Factory Five MkIV Roadster build thread

«First  <  1 2 | Page of 2  sorted by
 
Quick Reply

Please log in to post quick replies.

Chatbox
Please log in to join the chat!