Discussion Forum - Northstar Chevelle Club
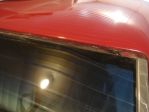
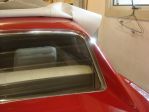
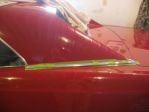
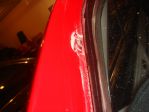
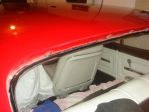
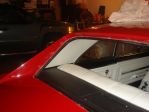
Members Login
Username 
 
Password 
    Remember Me  
Post Info TOPIC: How do I remove the Rear Window Molding on my 66


2K+ Club

Status: Offline
Posts: 2739
Date:
How do I remove the Rear Window Molding on my 66
Permalink  


Starting the vinyl top project.  Thought I should remove the front windshield and rear window molding to see if I need to remove or replace clips.  It is suggested to use new clips.

Now problem on removing the upper moldings on the front windshield.  But no idea of how to remove the rear window molding.  Maybe I even need a different tool?  Anyone done this before on a 66 that could give me a little advice?

Looks like the front clips cannot be replace unless you remove the windshield.  Looks like they were all replace at some time with clips held in by a screw as the top clips are suppose  to be held in by studs.

Though I should do the windshield moldings before I start drilling holes for attaching the sail panel area moldings.


Attachments
__________________

Jim L

Lake City


2K+ Club

Status: Offline
Posts: 2791
Date:
Permalink  
 

Karl would be your very best source of info on '66 trim - and in the off chance you might "bugger" one, he probably has a replacement (or 6)...

__________________


John D. - St. Louis Park, MN.

1965 El Camino - LT-1, 4L60e, 4wh discs, SC&C susp.
2013 F-150 Platinum - Twin Turbo 3.5

2018 Factory Five MkIV Roadster build thread


President

Status: Offline
Posts: 7328
Date:
Permalink  
 

I use the same tool for the rear as the front. The rear is much harder to get ahold of the clip and release it. I start at the top and work my way around the sides leaving the bottom for last.

The screws on the roof of yours must have been installed when the top was removed. My '66 has studs up there BUT mine is a late build and yours is early and some things changed during the model year production on the Chevelles.


__________________

Mitch D.   River Falls, WI

Lifetime member of the "Cars apart Club"

1966 Chevelle SS 396 M20

1970 Chevelle SS 396 M20

1967 Camaro SS/RS 350 M20


2K+ Club

Status: Offline
Posts: 2739
Date:
Permalink  
 

Petty sure clips have been replaced with screw instead studs when top was removed and car painted in 94.. Original stapels are still there along with a liitle hole where there was a screw through the seam of the vinyl. I would like to replace all the clips with new, if thats an option. Looks like maybe possible if I can cut out enough of the material holding the windshield in place. Will probably have to clean prime and paint the area.

I thought a tool with a different kind of a bend might be available and work better. Wish there was a you-tube video showing how to do this. I wish I had a piece of the rear moldings to look at and see what the underside looked like.

__________________

Jim L

Lake City


President

Status: Offline
Posts: 7328
Date:
Permalink  
 

Gonna be a job trying to get those screws out with the windshield in place. I don't think just loosening them will allow the clips to come off. If the clips are clean and not weak from rust, I don't think I would worry about them. With the vinyl installed, they will have to spread further to grab the molding and be very tight.

The rear molding is the same as the front. There is a lip along the paint edge that the clip grabs. When you slide the release tool along the window frame, it will stop when it gets to a clip. You then roll the tool so the tip prys the clip away from the frame enough to let the molding come loose.


__________________

Mitch D.   River Falls, WI

Lifetime member of the "Cars apart Club"

1966 Chevelle SS 396 M20

1970 Chevelle SS 396 M20

1967 Camaro SS/RS 350 M20


2K+ Club

Status: Offline
Posts: 2739
Date:
Permalink  
 

Sounds logical about the clips. Front clips are not rusted, don't know about the rear. The only reason I was thinking about the replacing the clips, is tahat a guy on a vinyl top installation recommended that; but he had the windshield and rear window removed. Leaving them in would really simpliy things. Thanks

Good to know there is also just a little L shaped lip on the rear moldings like the front. Llets hope good luck is with me tomorrow.

__________________

Jim L

Lake City


President

Status: Offline
Posts: 7328
Date:
Permalink  
 

This is the tool I have to release the clips. Do you have one like this ?

image-resize.aspx?image=KD2038_14101.gif|width=400


__________________

Mitch D.   River Falls, WI

Lifetime member of the "Cars apart Club"

1966 Chevelle SS 396 M20

1970 Chevelle SS 396 M20

1967 Camaro SS/RS 350 M20


2K+ Club

Status: Offline
Posts: 2739
Date:
Permalink  
 

That's the tool I have. Don't quite understand what you mean when you say "Then you roll the tool so the tip prys the clip away from the frame"?

__________________

Jim L

Lake City


2K+ Club

Status: Offline
Posts: 2791
Date:
Permalink  
 

You hook the clip with the tool, then using the "head" or top of the hook as a fulcrum/pivot point (against the car body), gently bend the clip away from the car body (frame) to release the tip of the clip from the rolled edge of the trim. If you wiggle and apply upward pressure on the trim it seems to help - once 1 or 2 are released it gets much easier.

__________________


John D. - St. Louis Park, MN.

1965 El Camino - LT-1, 4L60e, 4wh discs, SC&C susp.
2013 F-150 Platinum - Twin Turbo 3.5

2018 Factory Five MkIV Roadster build thread


2K+ Club

Status: Offline
Posts: 2739
Date:
Permalink  
 

Well I got 3 of the 5 pieces off. That tool is a pain; because of the design, it does not reach up high enough on the clip. I broke one clip off. I think I will be able to re-attach the clip with a 3/8" screw, looks like enough room. You need a more specialized tool to remove the moldings for a 66 chevelle with the sail panels.

On the rear the top clips are held on by a stud as done at the factory. They replace the left quarter panel with a full sail. When they attached the clips, they just used pop rivets. They also replaced the clips on the right side and installed with pop rivets. Don't know about the bottom, as I have not removed the ss molding there. From inside the trunk, it looks like that's the original panel between the sail area. I guess I will see if any work or repair when I get that piece off.


Attachments
__________________

Jim L

Lake City


President

Status: Offline
Posts: 7328
Date:
Permalink  
 

The pop rivets are what make the tool difficult to use. The clips aren't supposed to be trapped that tight against the body.

I removed all the rear window trim from my '67 GTO with that same tool without any big issue and it's the same trim.


__________________

Mitch D.   River Falls, WI

Lifetime member of the "Cars apart Club"

1966 Chevelle SS 396 M20

1970 Chevelle SS 396 M20

1967 Camaro SS/RS 350 M20


2K+ Club

Status: Offline
Posts: 2739
Date:
Permalink  
 

Lost in the 60s wrote:

The pop rivets are what make the tool difficult to use. The clips aren't supposed to be trapped that tight against the body.

I removed all the rear window trim from my '67 GTO with that same tool without any big issue and it's the same trim.


 Same experience here.  The sides with the pop rivets were to most difficult to release; Top was much easier.

Hopefully bottom goes OK.


__________________

Jim L

Lake City


2K+ Club

Status: Offline
Posts: 2444
Date:
Permalink  
 

Jim, any updates here? I think everyone is waiting to see what it is going to look like. I know I am because I am still trying to decide if I want to reinstall my V top.


__________________

Kevin

Northwestern Ohio


2K+ Club

Status: Offline
Posts: 2739
Date:
Permalink  
 

dashboard wrote:

Jim, any updates here? I think everyone is waiting to see what it is going to look like. I know I am because I am still trying to decide if I want to reinstall my V top.


 Had to remove the back glass.  All clips are now off including those with pop rivets.  I have removed all the excess urethane from the front pinch weld channel and  about to clean that area and clean and prime  the rear pinch weld area.  After cleaning I will try some of that new epoxy primer in a spray can to seal the area from any scratches.  Have to order that from Eastwood and some stainless screws and special clips  for installing the rear sail panel molding.  Just ordered some clips and screw in studs for the clips from Ashleys today. After all the prep work is done, I will have to decide if I will install  the vinyl top or have someone that Karl recommended install the top.  Then put the rear window back in with the butyl sealer or a urethane application similar to what is in the 66 fisher body manual.


Attachments
__________________

Jim L

Lake City

Page 1 of 1  sorted by
 
Quick Reply

Please log in to post quick replies.

Chatbox
Please log in to join the chat!