Discussion Forum - Northstar Chevelle Club

Members Login
Username 
 
Password 
    Remember Me  
Post Info TOPIC: The Body is off the 57 Chevy!


Active Member

Status: Offline
Posts: 179
Date:
RE: The Body is off the 57 Chevy!
Permalink  


Adding a couple more pics of progress. The motor and transmission in for the last time!!nana


Does the club still have a discount for driveshafts that Charlie got for us?????dunno


Attachments
__________________


2K+ Club

Status: Offline
Posts: 2745
Date:
Permalink  
 

bwild70ss396 wrote:

Adding a couple more pics of progress. The motor and transmission in for the last time!!nana


Does the club still have a discount for driveshafts that Charlie got for us?????dunno


 I am pretty sure we do. I havent heard anything otherwise. Another member PMed me a few weeks ago about this so I presume he has already been in touch with them as well. So I would have to say yes.


__________________

Chris - Ramsey, MN.

Dear Optimist, Pessimist, and Realist.

While you guys were busy arguing about the glass of water. I drank it!

Sincerly,

The opportunist.


Active Member

Status: Offline
Posts: 179
Date:
Permalink  
 

Added the headers, o2 sensors, AC pump and brackets, core support and radiator assembly.


-- Edited by bwild70ss396 on Sunday 26th of June 2011 04:39:48 PM

Attachments
__________________


Active Member

Status: Offline
Posts: 179
Date:
Permalink  
 

Finished up on all the rear end stuff. Brakes, brake lines, modified sway bar and end links.nana


Attachments
__________________


President

Status: Offline
Posts: 7328
Date:
Permalink  
 

Start putting scratches in things now or you won't want to drive it...cool

Very clean build, Brad...thumbsup


__________________

Mitch D.   River Falls, WI

Lifetime member of the "Cars apart Club"

1966 Chevelle SS 396 M20

1970 Chevelle SS 396 M20

1967 Camaro SS/RS 350 M20


Active Member

Status: Offline
Posts: 179
Date:
Permalink  
 

Thank you Mitch! I am sure it will get plenty of rock chips, rain and maybe a few rubber fragments under it!gearbanger


__________________


President

Status: Offline
Posts: 7328
Date:
Permalink  
 

bwild70ss396 wrote:

I am sure it will get plenty of rubber fragments under it!gearbanger


nanabeersthumbsup


__________________

Mitch D.   River Falls, WI

Lifetime member of the "Cars apart Club"

1966 Chevelle SS 396 M20

1970 Chevelle SS 396 M20

1967 Camaro SS/RS 350 M20


2K+ Club

Status: Offline
Posts: 2791
Date:
Permalink  
 

Brad - I'm using the same/similar rear calipers... Not to be the bearer of bad news, but looking at the photo (and not knowing your setup) it appears you've got things bolted on incorrectly. headscratch


The calipers and axle tube plates/mounts need to be exchanged side for side, and re-mounted with the calipers rearward - with the hole for the e-brake cable pointed forward.

(This shouldn't impact your hard line install, as the flex line will just go rearward, instead of to the (now) front.) dunno


__________________


John D. - St. Louis Park, MN.

1965 El Camino - LT-1, 4L60e, 4wh discs, SC&C susp.
2013 F-150 Platinum - Twin Turbo 3.5

2018 Factory Five MkIV Roadster build thread


Active Member

Status: Offline
Posts: 179
Date:
Permalink  
 

clonk
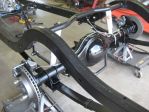
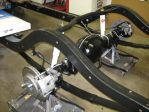
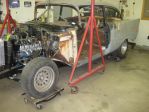
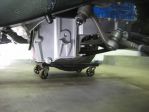
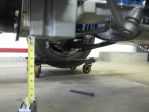
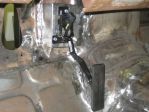
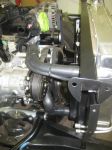
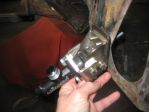
John after further investigation, you are correct. I will have to see how much I have to modify them to go on the correct way. Meaning putting Chevy parts on on Ford rear end.  I guess thats what I get for a no directions, no clue how to do it deal and first time doing it. I dont think I would have noticed until I tried to hook up the e brake cable. The brakes would have functioned correctly.


On a happier note, I finally found a sway bar that will work and someone who would measure the end link center to center so I could get a front sway bar to connect to my control arms. Most kits are for stock lowers aand you have to drill the end link brackets or mount holes. I am glad its the same brand as my rear one. The first Hellwig one was to narrow.  


-- Edited by bwild70ss396 on Saturday 16th of July 2011 12:40:48 PM


-- Edited by bwild70ss396 on Saturday 16th of July 2011 12:45:11 PM

Attachments
__________________


Active Member

Status: Offline
Posts: 179
Date:
Permalink  
 

nanaRear end stuff is complete take 2!beers

It was a easy swap to change calipers and brackets around. Only some minor paint scrapage to be fixed later.

Ordered my steel driveshaft and cowl panel for body as thats where all my attenion soon will be focused. Mini tub, cowl repair, lots of weld and seem grinding, and after that some I am guessing heavy transmission tunnel mods.


-- Edited by bwild70ss396 on Saturday 16th of July 2011 03:32:08 PM

Attachments
__________________


President

Status: Offline
Posts: 7328
Date:
Permalink  
 

I see e-brake cables pointing forward...nana

Nice catch, John...notworthy


__________________

Mitch D.   River Falls, WI

Lifetime member of the "Cars apart Club"

1966 Chevelle SS 396 M20

1970 Chevelle SS 396 M20

1967 Camaro SS/RS 350 M20


Active Member

Status: Offline
Posts: 179
Date:
Permalink  
 

A few pics of my cowl replacement. You cant see the damage very well in the before picture. The drivers corner was smashed down about 3/8" and then mauled up and patched.tsktsk

New piece did not fit to bad. Will probably work on plugging some holes in firewall next weekend.


-- Edited by bwild70ss396 on Saturday 30th of July 2011 05:45:11 PM

Attachments
__________________


President

Status: Offline
Posts: 7328
Date:
Permalink  
 

The new panel looks nice ! I don't know what you're talking about getting off your lazy duff. Anyone that tackles a panel replacement like that isn't lazy...beers


__________________

Mitch D.   River Falls, WI

Lifetime member of the "Cars apart Club"

1966 Chevelle SS 396 M20

1970 Chevelle SS 396 M20

1967 Camaro SS/RS 350 M20


Active Member

Status: Offline
Posts: 179
Date:
Permalink  
 

Just got my Denny's Driveshaft Thursday. Looks nice and fits nice. He was very easy to talk to to and willing to spend the time answering questions and making sure you get exactly what you are looking for. I ended up buying a 700hp shaft and upgrading rear yoke to handle that power. He said the one I had was good for in the 500hp range. $467 front yoke , rear yoke, and shaft shipped to my house.  Would highly recommend his business.thumbsup


Starting to do mini tub before patching holes in firewall. Alot of headscratching going on, but will get it to work. I cut the old tub out then moved it in 3" and will fill the gap then with a filler strip. It lloks like there will be 15 - 16" about of tire room! nana I think that might be wide enough!!  I went and bought a sheet of steel for strips at Discount Steel in Mpls and long as I was down there checked out the tornado damage in my old hood. I see it missed my first house by about 3-4 blocks!


-- Edited by bwild70ss396 on Friday 12th of August 2011 04:53:39 PM


-- Edited by bwild70ss396 on Friday 12th of August 2011 04:57:32 PM

Attachments
__________________


Active Member

Status: Offline
Posts: 179
Date:
Permalink  
 

banghead
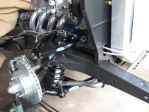
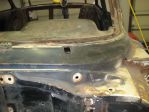
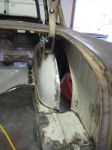
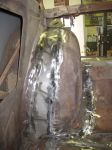
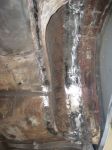
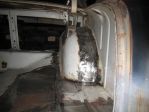
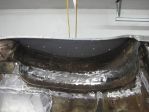
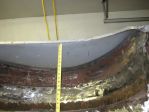
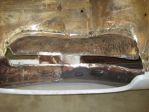
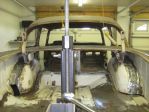
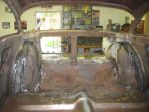
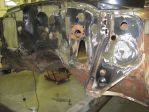
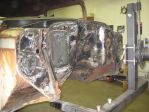
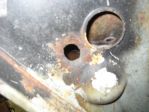
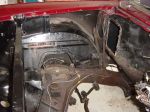
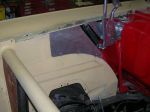
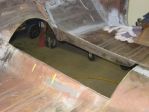
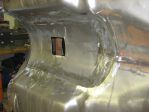
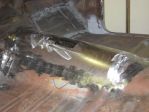
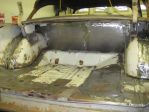
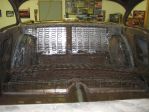
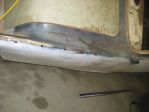
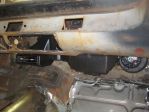
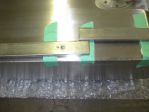
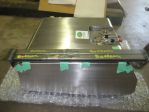
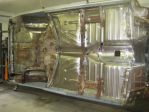
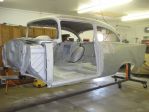
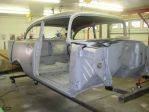
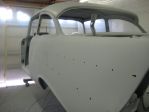
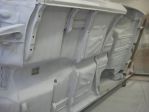
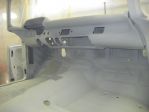
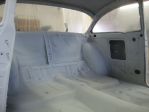
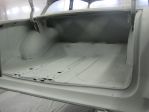
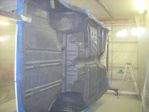
I have made some progress with one side of the mini tub. Its taking alot longer and being more complicated then planned on. Having fun welding panels with remnents of paint and undercoating that I could not get all the way off in the corners.
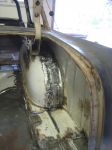


Attachments
__________________


President

Status: Offline
Posts: 7328
Date:
Permalink  
 

The fun of welding old, dirty metal. It'll all look great when it's done...beers


__________________

Mitch D.   River Falls, WI

Lifetime member of the "Cars apart Club"

1966 Chevelle SS 396 M20

1970 Chevelle SS 396 M20

1967 Camaro SS/RS 350 M20


Active Member

Status: Offline
Posts: 179
Date:
Permalink  
 

One side pretty well done and starting on side two. Hopefully no foreign particals in my eye this weekend to impeed progress! Made it past goggles and everything!


-- Edited by bwild70ss396 on Friday 2nd of September 2011 08:58:09 AM

Attachments
__________________


Active Member

Status: Offline
Posts: 179
Date:
Permalink  
 

I am kinda partial to this tape measure pic myself!!!gearbanger helps make all the many hours and bodily injuries worth while!


-- Edited by bwild70ss396 on Friday 2nd of September 2011 09:02:49 AM

Attachments
__________________


Founding Member

Status: Online
Posts: 2792
Date:
Permalink  
 

16" is a lot of space to fill! What are you going to run for tires & wheels?

__________________

Derek Kiefer - Mantorville, MN

69 Malibu Pro-Touring stroker LS1-383/T56 - 69 SS396-325/3spd project


Active Member

Status: Offline
Posts: 179
Date:
Permalink  
 

At the front and back of the wheelwell it narrows to about 15" or so. I am planning to purchase 333/35/17" for the back on a 17"x11" rim. In the Pilots that size is about 13.5" wide, so about .75 clearance both sides I am hoping for? Does that sound like a nice amount?  What I did was make the wheelwells what ended up being about 1/2" more narrow then the frame rails in back. I just went off a old article in a magazine called Classic Chevy and thats what it looked like they did. The Tri-Five forum also has a few guys that have done similar.


Second side tacked in a little. Seeing if I can order a small trunk floor patch panel next. It has a little more rust then I can fix with my simple tools by the fuel tank curve.


-- Edited by bwild70ss396 on Friday 2nd of September 2011 01:24:27 PM

Attachments
__________________


Founding Member

Status: Online
Posts: 2792
Date:
Permalink  
 

335s might look a little too bulged on an 11" wheel... I'd go 12" if it's not too much extra cost.

__________________

Derek Kiefer - Mantorville, MN

69 Malibu Pro-Touring stroker LS1-383/T56 - 69 SS396-325/3spd project


President

Status: Offline
Posts: 7328
Date:
Permalink  
 

bwild70ss396 wrote:

I am kinda partial to this tape measure pic myself!!!gearbanger helps make all the many hours and bodily injuries worth while!


-- Edited by bwild70ss396 on Friday 2nd of September 2011 09:02:49 AM


Yaaaa duuuude, that is cool....notworthy


__________________

Mitch D.   River Falls, WI

Lifetime member of the "Cars apart Club"

1966 Chevelle SS 396 M20

1970 Chevelle SS 396 M20

1967 Camaro SS/RS 350 M20


Active Member

Status: Offline
Posts: 179
Date:
Permalink  
 

I will check into a 12" wheel for the back. I am not sure if they have those for 17" wheels? I have seen for 18" I believe.

Made some progress this weekend with second side and have trunk floor patch ordered for next weekends install hopefully.


Attachments
__________________


Active Member

Status: Offline
Posts: 179
Date:
Permalink  
 

With the trunk patch coming a little late I redirected to work on the firewall a bit for some plugging of about 40 or so holes. It still needs alot of work, but it should look good when done.

I included a shot of the one of two found bullet holes! I am guessing while it resided in Texas it was used for rifle practice! aknana

I also put in a before shot of trunk floor area that I will be working on also


Attachments
__________________


President

Status: Offline
Posts: 7328
Date:
Permalink  
 

Looks nice. You must going with Vintage air, since you blocked off all the vents and heater.

I think any car that sat in a field for a period of time became a target for shooters. I know I've added a number of holes to old cars over the years...thumbsup


__________________

Mitch D.   River Falls, WI

Lifetime member of the "Cars apart Club"

1966 Chevelle SS 396 M20

1970 Chevelle SS 396 M20

1967 Camaro SS/RS 350 M20


Active Member

Status: Offline
Posts: 179
Date:
Permalink  
 

I am planning on going with a Vintage Air or Old Air system for heat and air conditioning. I also blocked of air vent tubes, wiper holes as I am going with a inside mount Raingear system, Throttle hole since DBW, Speedo cable hole since I while be running a wire, all holes for firewall pad since I will be using Dynamat or similar product, and clutch rod hole. I may have to drill that one back out for the hydraulic clutch system? I going to try to make most stuff more hidden if possible.

I am moving the battery also from core support to maybe between fender well and firewall area that the tube once ran through. I am checking into those newer small batteries.The picture if of other cars showing the area I am thinking about moving the battery too.


-- Edited by bwild70ss396 on Sunday 11th of September 2011 02:00:12 PM

Attachments
__________________


Active Member

Status: Offline
Posts: 179
Date:
Permalink  
 

Test fitting the body today before going to work on my wifes old house that we are trying sell. Cant wait for it to sell!

It did not fit to bad. Will need some floor mods of about 1.5" in center. Shifter location turned out well. seat is all the way forward. Also will need to trim edges of mini tub. Lips hitting frame. Easy fix. Was happy for just cutting hole in floor and setting on.dancenana


And yes like Derek I did sit in it and make vroom vroom noises!


Attachments
__________________


Active Member

Status: Offline
Posts: 179
Date:
Permalink  
 

Made some tunnel mods for the 6 speed. It should fit no problem now. I may have to put curve mod in seat frame ? I have not check yet. A few pics of my hacking


Attachments
__________________


President

Status: Offline
Posts: 7328
Date:
Permalink  
 

Nice hack job !!! Bucket seats would fit nice...dunno


__________________

Mitch D.   River Falls, WI

Lifetime member of the "Cars apart Club"

1966 Chevelle SS 396 M20

1970 Chevelle SS 396 M20

1967 Camaro SS/RS 350 M20


Active Member

Status: Offline
Posts: 179
Date:
Permalink  
 

A few pics of back panel / brace install and the rear seat fitting after back frame mods. Looks like seat will work out good. I am glad for a full rear seat.


Attachments
__________________


Active Member

Status: Offline
Posts: 179
Date:
Permalink  
 

Set body back on frame and it actually sits on the mounts! Will leave body on for winter storage. The roller junk tires are 12" wide and they have plenty of room!  Wife's car actually will be in garage for first time since we have been married! She is very happy!


Attachments
__________________


President

Status: Offline
Posts: 7328
Date:
Permalink  
 

Storage ??? How you gonna make Car Craft if you don't work on it all winter ??


__________________

Mitch D.   River Falls, WI

Lifetime member of the "Cars apart Club"

1966 Chevelle SS 396 M20

1970 Chevelle SS 396 M20

1967 Camaro SS/RS 350 M20


Active Member

Status: Offline
Posts: 179
Date:
Permalink  
 

I have many years yet before it make it to Car Craft! I am missing not having a car or Harley for crusing around in or on. Next spring I will finish the body welding and grinding then take body to blasting, prime paint bottom and then undercoat like I did my El Camino. The $ to finish will get harder to come by. Need about 10K yet. Anybody with some free cash?

__________________


President

Status: Offline
Posts: 7328
Date:
Permalink  
 

bwild70ss396 wrote:

I have many years yet before it make it to Car Craft! I am missing not having a car or Harley for crusing around in or on. Next spring I will finish the body welding and grinding then take body to blasting, prime paint bottom and then undercoat like I did my El Camino. The $ to finish will get harder to come by. Need about 10K yet. Anybody with some free cash?


Forget the paint for now. In this age of rat rods and flat paint, it will fit right in. I have a torpedo heater you can use for heat over the winter to keep "grinding" away at it. Get that puppy on the road !! Look at my heap...razz

I was cleaning out the Pete to put it in storage today and found a stash of mad money I forgot about. $60 won't even fill the tank on my pick-up, but it's more than I had an hour ago...thumbsup


__________________

Mitch D.   River Falls, WI

Lifetime member of the "Cars apart Club"

1966 Chevelle SS 396 M20

1970 Chevelle SS 396 M20

1967 Camaro SS/RS 350 M20


2K+ Club

Status: Offline
Posts: 2745
Date:
Permalink  
 

Brad. You should take advantage of this warm weather and get a few things done on that car. You will be ahead of the game and having a nice warm winter like this so far is quite an advantage on getting stuff done.


__________________

Chris - Ramsey, MN.

Dear Optimist, Pessimist, and Realist.

While you guys were busy arguing about the glass of water. I drank it!

Sincerly,

The opportunist.


Active Member

Status: Offline
Posts: 179
Date:
Permalink  
 

Finally getting back to working on my car. The first project was taking motor half out to put new low profile Holley oil pan on. Gained 2.5 inches of clearance. Steering still looks same as with original pan.


Attachments
__________________


Mega Poster

Status: Offline
Posts: 713
Date:
Permalink  
 

Wow, you still may want to make a skid plate for protection.


__________________

John E - Rogers, MN

Instructions? All I need is the exploded view.
70 El Camino soon to be ls1/t56
64 Malibu SS


Member

Status: Offline
Posts: 73
Date:
Permalink  
 

Just went through the build (too bad the old pic's are gone) looking great, keep up the good work.

__________________

Bruce L - Lakeville MN

1971 Chevelle

1959 Nomad Wagon


Active Member

Status: Offline
Posts: 179
Date:
Permalink  
 

Slow progress so far this year! Heres a few more of todays projects finished DBW throttle mount and getting hoses to fit. 


Attachments
__________________


Founding Member

Status: Online
Posts: 2792
Date:
Permalink  
 

Brad, would an F-body pan help? I've got one you can test fit if you want to try it.

__________________

Derek Kiefer - Mantorville, MN

69 Malibu Pro-Touring stroker LS1-383/T56 - 69 SS396-325/3spd project


Active Member

Status: Offline
Posts: 179
Date:
Permalink  
 

Derek, The pan I put on will work now. The original truck pan was way to low. Bottom of pan now higher then bell housing


__________________


Active Member

Status: Offline
Posts: 179
Date:
Permalink  
 

some more pics including adding 16 more trim holes with a dremel tool


-- Edited by bwild70ss396 on Saturday 30th of June 2012 08:35:00 PM

Attachments
__________________


Active Member

Status: Offline
Posts: 179
Date:
Permalink  
 

A few pics on progress, fitting Vintage air, fixing rusted glove box, fitting hyd clutch, cutting and fitting tank mounts and much grinding 


Attachments
__________________


Active Member

Status: Offline
Posts: 179
Date:
Permalink  
 

The final body shots before the going to the blaster in a few days


Attachments
__________________


Mega Poster

Status: Offline
Posts: 718
Date:
Permalink  
 

Nice work. Are you sand or media blasting it?

If you're media blasting it are you going to DA it before primer?

__________________


Active Member

Status: Offline
Posts: 179
Date:
Permalink  
 

Sand blast in more rigid parts and Media on panels that could warp. Same way I did my El Camino. I primered the whole car and painted and put a hard undercoat on bottom. The painter guy sanded off all primer on topside to metal again two years later when I had it painted. He does not go over other peoples work. I did not mind with the quality paint job he does. I have already talked to the same guy about doing my 57.

__________________


Active Member

Status: Offline
Posts: 179
Date:
Permalink  
 

Off the the Sand / Media blaster


Attachments
__________________


Active Member

Status: Offline
Posts: 179
Date:
Permalink  
 

Back from Blaster and ready to spray


Attachments
__________________


Active Member

Status: Offline
Posts: 179
Date:
Permalink  
 

Sprayed in my Osha approved spray booth


Of course my compressor went just before I needed to spray, so I had to go buy a new one


Attachments
__________________


Active Member

Status: Offline
Posts: 179
Date:
Permalink  
 

Start of spraying Lizard skin on bottom of the car. It worked good. It is now a two part multi coat product. Different then when Derek did his car.


Attachments
__________________
«First  <  1 2 3  >  Last»  | Page of 3  sorted by
 
Quick Reply

Please log in to post quick replies.

Chatbox
Please log in to join the chat!