Last fall I started work on my Impala convert. Both quarters are rusty and soft around the wheel openings and lower rear under trunk, along with the front and rear of the outer wheel house. There is also holes in the foreword trunk to frame supports, trunk floor over the supports and the inner wheel house where the support meets the wheel house.
So today I finished up welding the quarter skin section to the panel, still need to weld around the wheel opening lower rear and up the back of the panel.
Here also are picture of the right side, similar to what I started with.
All too typical of these cars. If you hadn't said it was an Impala, it just as well could be a Chevelle.
The new side looks great.
I thought it was interesting that Chris P. had a similar rust problem at the foreword trunk support. The support, the floor and the inner wheel house where the support connects all rusted through. It seems that the support that curve into the inner wheel house are more prone to rot ware as other body styles mid to lat 60s with straight floor brace aren't as bad, all te other supports/braces on the car are very solid. Thought I,d be doing much more floor repair, but all the rest of the floor also looks very good.
At the time I bought the car, the catalog companies did not carry any of the curved trunk supports for Impala, so I had them and the floor section cut out of another car.
Here is the finished left side, old floor support and the section for the right.
-- Edited by Bobs_Place on Saturday 29th of December 2018 11:02:51 AM
I have parted out multiple 68 Chevrolet b-bodies.
There is some interchange on frames, floors and some inner panels 65-70.
Let me know of you need anything.
Karl
__________________
More ambition than brains,
If you have more than 5 of anything, best to stop counting!
I have parted out multiple 68 Chevrolet b-bodies. There is some interchange on frames, floors and some inner panels 65-70. Let me know of you need anything. Karl
Karl
Thanks very much. I think??? I'm ok. But never know what might turn up.
The plan was to replace the complete outer wheel house. But when I cut the Q panel I found that the convertible wheel house was different from the all other models wheel house. Had to order a wheel house from a hardtop as the convert is not reproduced. The pinch weld is tipped outward on the converts to make room for the convert top stuff. So I left part of the wheel house in place sectioned in the front and rear from the new part. The trunk drop was also replaced.
I put a 1 1/2 x 1/8 strip of aluminum screwed to the back of the quarter at the weld seam to help hold the new panel part to the original. That worked great, the aluminum helped to kept the two panel straight and aligned and soaked up a lot of heat. The welding went very good.
So after finishing up welding the the of quarter panel, I found that the panel did not have the correct shape, it was slightly concave at the rear and should curve slightly outward. Not sure if the welding caused the metal to shrink or I just didn't have the right shape to begin with. So I tried to push and pull the panel to get the correct curve. The panel did not have to be moved much, just out past straight. Well I was able to get the shape I wanted but in doing so I found the body line was pushed up and out of shape at the rear.
This is before finish welding and reshaping the curve.
As I pushed the panel out the rear was forced up about 1/4-3/8"bending the panel just above the body line. To fix and straight I cut the weld about 24" from the rear forward to re-leave the pressure. Unfortunately the picture didn't show the misalignment very well.
I hung about 200lbs. at the the rear bolt and worked the panel to pull the body line down, it realigned very nicely, then rewelded.
Glad things worked out. I saw something similar on the repair of a hole in the lower rear of a chevelle fender; only differenence being that used a copper piece. Would there be advantages on one over the other? Good to see you and Mitch keeping warm in the garage.
Ain't this restoration work fun ??!! Especially the slicing and dicing of replacement panels that don't quite fit correctly..
Glad you got yours to fit that well...
Was surprised to to see that the lines did not line upI did check it before I finished welding 
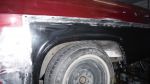
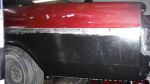
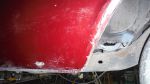
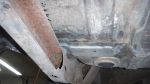
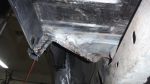
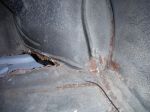
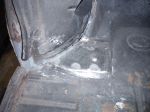
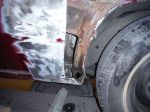
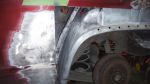
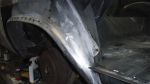
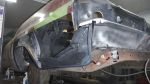
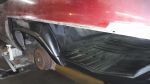
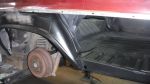
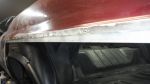
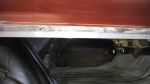
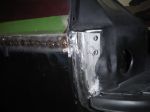
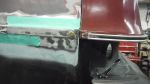
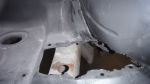
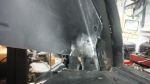
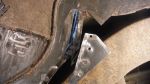
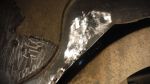
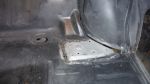
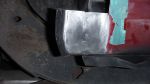
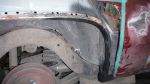
I wasn't sure what happened. So I decided to take a chance , cut the weld and see if I could straighten it out. By pushing the panels from the inside after cutting the weld I could see the gap widen, It didn't take much to cause the gap grow quite a lot. At the time the rear pinch weld had not been welded and with the panel welded and forcing it out, the panel would not stretch at the push point so it had to go somewhere, the panel kicked up in the rear.
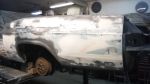
I've used copper in the past with sheet metal, it works well. That's what gave me the idea to use the aluminum. As long as you can get the copper or aluminum flat against the back of the sheet metal you get better, more consistent weld and more time before blowing through. I also think (don't know for sure) the back metal seems to absorb a lot of heat so there is less shrinkage in your work, hard to tell for sure about that however.
Which metals conduct heat best Common metals ranked by thermal conductivity Rank Metal Thermal Conductivity [BTU/(hr·ft⋅°F)] 1 Copper 223 2 Aluminum 118 3 Brass 64
I would have thought aluminum over the copper, interesting. I know from heating cast aluminum when trying to remove broken or frozen bolt it takes a lot of heat, the whole part gets hot, steel or cast iron is much more localized.
So, I,v been doing the chemical filler (aka) mud work for the last few day/weeks or so. Never really done this before and it has taken a lot more time than I thought it would. The learning curve is longer than I thought it would be. I think it's looking fairly good just a little more to go. When I'm satisfied I thought i would put a good coat of epoxy on to seal up my work.
I started on the right side, first order of business is the trunk floor. I cut the right side lower Q panel open to get access to the trunk floor right at the forward trunk support. I trimmed up the opening on the floor and inner wheel house and started to fit the insert.
I am a fan of a "skim coat" of polyester catalyzed glazing filler. The problem with multiple applications of different products is that they are all of differing hardness and levels of cure. Because of that they will sand differently and become less straight the more you sand.
The skim top coat avoids that. Notion is to end up with one uniform finish with only minimal metal showing. Do in Sections either in 1/4s or 1/2 upper lower. Slight overlap where the metal will be exposed after blocking, eliminates overfilling. The style line is a perfect break point, tape it so no overlap.
There are some very high build primer surfacers that do well for scratches an minor imperfections, they often will not often totally resolve the mixed product and application issue.
Looks great, I would not trust myself to attempt that level of welding, not my skill set.
I am truly a BS'er not a great technician.
Karl
__________________
More ambition than brains,
If you have more than 5 of anything, best to stop counting!
Thanks for the input, and as for the BS---------I've seen your work!!!
The plan is to do the body work one panel at a time starting with the quarters, doors and than fenders, than seal each with epoxy as I go so not to have too much opened to the elements. Than frame & susp, eng. compartment, and convet top made (but removed for paint). I'm thinking two-three years, than a skim top coat/high build primer surfacer and paint.
I finished cutting and trimming the right side trunk floor and inner wheel house.
First I cut out the rust by the pinch weld rear of the wheel house, mad a patch and installed.
Than the pinch weld at the inner wheel house over frame, had to cut out both the inner and outer to make the repair.
With the inner lip replaced, the patch was cut to fit and ready to install.
And welded into place.
Than fit and installed the part in the forward trunk floor. Need to finish grinding the weld fit and install the lower patch part or the wheel house /primer than install the frame to floor support.
It seems like thing have been going slow but there has been a lot of little repairs that are needed that just take time. I finished the trunk floor and foreword trunk support along with the inner wheel house.
Cut out a lot of rust around the wheel house.
I cut and sectioned in the rear wheel house, will have to add a short piece at the lower rear of the new piece. The new outer wheel house was cut short on both ends.
Made a inner and outer pieces to complete the rear part of the wheel house.
The right front corner of the wheel opening was very thin, rusty and not worth fixing.
So I cut off the bad corner, made new and installed.
Cut and fit the front part of the outer wheel house and welded it in.
The seam was below the holes, above the black painted area.
Last week I finished installing the right side quarter panel section, again from below the body line down as the rust areas were only around the wheel well and behind below the trunk floor. After welding the section on I removing all the previous filler. I found a lot of rust under the paint and filler, nothing serious but I couldn't just cover it up so I than sand blasted those areas and the welded seam to prepare the panel. Epoxy primed, did some filler and sanding, than reprimed to seal things up.
Still more work is needed on the quarters but will probably let the painter do the finish work.
Time to move the Impala to the other garage so I can get to other car and house projects. Summer IS coming.