Discussion Forum - Northstar Chevelle Club

Members Login
Username 
 
Password 
    Remember Me  
Post Info TOPIC: See where fixing a little spider web on a hood can lead you


2K+ Club

Status: Offline
Posts: 2737
Date:
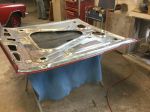
See where fixing a little spider web on a hood can lead you
Permalink  


IMG_0271.JPGWell you may as well paint the underside.


-- Edited by jim larson on Friday 28th of April 2017 04:49:13 PM

Attachments
__________________

Jim L

Lake City


1K+ Club

Status: Offline
Posts: 1196
Date:
Permalink  
 

Slippery slope of this hobby.
Remember the factory left it satin black, actually just primer, lacquer at that!

Have fun!

Karl

__________________

More ambition than brains,

If you have more than 5 of anything, best to stop counting!


Active Member

Status: Offline
Posts: 469
Date:
Permalink  
 

And then starts the "as long as we are" disease.

__________________

Larry L.

Coon Rapids


President

Status: Offline
Posts: 7327
Date:
Permalink  
 

Larry Lucast wrote:

And then starts the "as long as we are" disease.


 I don't understand, could you explain that theory...laughinglaughinglaughing


__________________

Mitch D.   River Falls, WI

Lifetime member of the "Cars apart Club"

1966 Chevelle SS 396 M20

1970 Chevelle SS 396 M20

1967 Camaro SS/RS 350 M20


2K+ Club

Status: Offline
Posts: 2737
Date:
Permalink  
 

more ambition than brains wrote:

Slippery slope of this hobby.
Remember the factory left it satin black, actually just primer, lacquer at that!

Have fun!

Karl


 I understand it was dipped in black lacquer,  then when they were painting hoods, fenders, trunks, and doors red for the day they painted a bunch, with overspray under the underside along the edges.  There were actually 5 coats of paint on the underside.  The original black lacquer, then a primer, then a red, then another primer, then black again.


__________________

Jim L

Lake City


1K+ Club

Status: Offline
Posts: 1196
Date:
Permalink  
 

If I remember right, the front sheetmetal was painted on a separate line.
Body shell with doors and trunk installed were painted as an assembly separate from front.
Was basically an empty body shell. Front sheetmetal was on some kid of brackets, color was blown over the edges on the fenders, almost no overspray on hood edges.
Doors, hinges, both trunk and doors were bare metal, body shell was bare metal all assembled.
1/4 extensions were set in place after caulking and priming body shell, installed and left loose after prime coats for topcoats.
Most often body primer was brown, depending on color, front sheetmetal black primer.
Sometimes body shell had two colors of primer, brown and black
If doors have never been off there is some caulking sealant on hinge surfaces, otherwise bare metal on mounting surface.
It has been a loooong time, but if I think most replacement sheetmetal came in black primer.
1/4 extensions bare or brown primer.
Most products were lacquer based, except for some pot metal pieces, they had some weird brown enamel product.
The brown body primers may also have been enamel based for adhesion to galvanized panels
This is on GM, whole different story on Ford, Chrysler.
Oh, and different plants had different processes!

Jim your under hood explanation is new to me.
I do not recall anything but lacquer primer, kind of a dull satin finish on the underside of hood panels.
I have a couple of original hoods, maybe we should do a research project.

Agree on the dipping, particularly on replacement parts.
Stayed up ALL night on a Thursday trying to smooth the primer out on several hoods fro prime and paint next day.
Took a really long time with 320 grit papers of the day (1968)

We are so blessed with our current materials.
Karl


__________________

More ambition than brains,

If you have more than 5 of anything, best to stop counting!


2K+ Club

Status: Offline
Posts: 2737
Date:
Permalink  
 

http://www.chevelles.com/forums/12-body-shop/943353-67-underside-hood.html  I had looked at a post from Jeff Helms, who is kind of considered an expert of 65-67 chevelles, he has about 10 of them and most are original.

I kind of thought doors and trunk were painted along with hood and fenders; but you are correct as confirmed by another post I found from Jeff H indicates body was painted with door and trunk attached.  Now I will have to look at that 66 4 door parts car I have that I think never had the doors or trunk off.  Jeff seemed to think overspray on hoods varied according to plant.  I have  brown/red primer still on the inside of my car and also some appears to still exist on the underside the trunk upper panel that I cleaned.

I had my hood painted with just a little overspray near the edges.  I don't know if you are familiar with a guy from Chicago area  I think name is Rick Nelson that does restorations on chevelles and camera's.  He seems to indicated that the front sheet metal came with various amounts of gloss and color and when he does restorations, he uses a different gloss, etc for inner fenders, firewalls, hoods, etc.  Thanks for your comments. 

On a side note, a guy here in Lake City started working in the Chevy garage in the early 60's, spent his whole life in body work.  He said they use to buff out the lacquer on all new cars before the customer picked them up.  I wonder if this was standard practice or Herron Chevrolet went the extra miles?


-- Edited by jim larson on Sunday 30th of April 2017 11:10:02 AM

__________________

Jim L

Lake City


1K+ Club

Status: Offline
Posts: 1196
Date:
Permalink  
 

Looks like Jeff and I agree?
Note: 64-65 had a completely different edge flange design.
In order to get color on the edge it requires rolling color over the corner, thus more o/spray on the underside.
66-67 had no edge flange, just a flat crimped hem flange, like a door edge.
They went back to the full flange in 68.

Firewalls tended to be a little glossy, once again depending on plant.
Core support and wheel housings were mostly that satiny primer type material.
Most bumper brackets and flange type brackets were in the satin black material.

Replacement fenders were edge painted (cut in) prior to us installing, 66-67 Chevelle hoods just bolted on and painted in place.
64-65 and 68 up were edge painted, bolted on and painted on car.
We painted very few items off car, unlike today.
Masking jambs, mouldings, and emblems was the order of the day.
Whole different (lower) level of quality to what we produce today.

This is a fun topic for me, brings back a lot of "back in the day" memories.

Thanks to you Jim,
Karl


__________________

More ambition than brains,

If you have more than 5 of anything, best to stop counting!


2K+ Club

Status: Offline
Posts: 2737
Date:
Permalink  
 

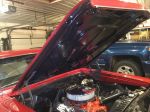
Hood is finished and back on.  Now to work on getting the right stance.IMG_0275.JPG


Attachments
__________________

Jim L

Lake City


2K+ Club

Status: Offline
Posts: 2444
Date:
Permalink  
 

Looks good Jim. Have you had your hood hinges rebuilt?

__________________

Kevin

Northwestern Ohio


2K+ Club

Status: Offline
Posts: 2737
Date:
Permalink  
 

dashboard wrote:

Looks good Jim. Have you had your hood hinges rebuilt?


 No, they work fine.  They may have been rebuild prior to the paint in 94, there is suppose to be a guy on TC that is an expert of rebuilding hinges if you need that done.


__________________

Jim L

Lake City


President

Status: Offline
Posts: 7327
Date:
Permalink  
 

jim larson wrote:
dashboard wrote:

Looks good Jim. Have you had your hood hinges rebuilt?


 No, they work fine.  They may have been rebuild prior to the paint in 94, there is suppose to be a guy on TC that is an expert of rebuilding hinges if you need that done.


 I just got mine back from Willie in VA. $210 with round trip shipping. www.hoodhingerepair.com


-- Edited by Lost in the 60s on Wednesday 3rd of May 2017 05:21:51 PM

__________________

Mitch D.   River Falls, WI

Lifetime member of the "Cars apart Club"

1966 Chevelle SS 396 M20

1970 Chevelle SS 396 M20

1967 Camaro SS/RS 350 M20

Page 1 of 1  sorted by
 
Quick Reply

Please log in to post quick replies.

Chatbox
Please log in to join the chat!