Discussion Forum - Northstar Chevelle Club

Members Login
Username 
 
Password 
    Remember Me  
Post Info TOPIC: The Munster Koach


2K+ Club

Status: Offline
Posts: 2791
Date:
The Munster Koach
Permalink  


Since completing "Dragula" a few weeks ago, I couldn't let things lay...

Started on the sister kit, the Koach.

All in all it too is a pretty crappy kit - detail is minimal, and the molds were tired. AMT must have just banged these out to "ride the curl" when the show was the hottest thing on the tube. There's no real detail/parts for the suspension, the "ornate-work" is clunky, and the engine is dismal.

I wound up buying an open-box '66 Mustang kit cheap, just to get an engine with some accurate detail. About the only thing for the engine from the original kit will be the generator/pulley/belt molding - everything else will be from the Mustang or scratch-built.

1st things to go were the velocity stacks. They were out of scale, not angled correctly, and chromed. The prototypes are brass, and angled forward...


Attachments
__________________


John D. - St. Louis Park, MN.

1965 El Camino - LT-1, 4L60e, 4wh discs, SC&C susp.
2013 F-150 Platinum - Twin Turbo 3.5

2018 Factory Five MkIV Roadster build thread


Founding Member

Status: Offline
Posts: 2791
Date:
Permalink  
 

Nice work!

The body for the Koach was built from (3) '26-27 Model T touring car bodies...

__________________

Derek Kiefer - Mantorville, MN

69 Malibu Pro-Touring stroker LS1-383/T56 - 69 SS396-325/3spd project


President

Status: Offline
Posts: 7328
Date:
Permalink  
 

Very nice, I won't mention the "anal" issue with the stack mods...laughing  
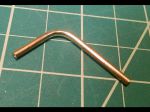
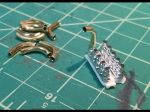
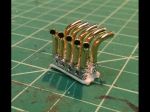
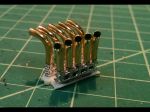
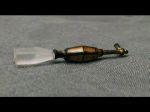
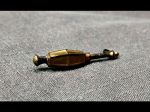
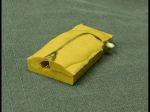
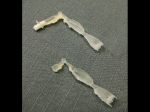
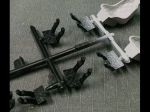
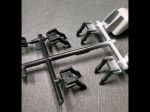
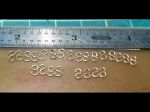
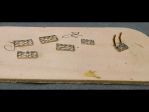
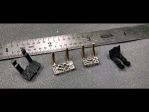
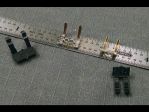
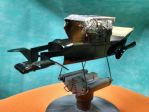
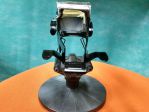
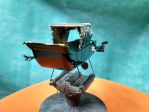
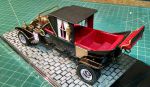
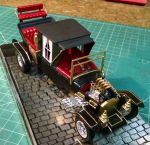
Are you going to flare the ends of the tubing too ?  razz

Um, if you have a lot of spare time for a project, I can help fill that void...dunno


__________________

Mitch D.   River Falls, WI

Lifetime member of the "Cars apart Club"

1966 Chevelle SS 396 M20

1970 Chevelle SS 396 M20

1967 Camaro SS/RS 350 M20


2K+ Club

Status: Offline
Posts: 2791
Date:
Permalink  
 

A few progress pics...

Engine's coming together. Working on the fuel delivery rails.


Attachments
__________________


John D. - St. Louis Park, MN.

1965 El Camino - LT-1, 4L60e, 4wh discs, SC&C susp.
2013 F-150 Platinum - Twin Turbo 3.5

2018 Factory Five MkIV Roadster build thread


2K+ Club

Status: Offline
Posts: 2791
Date:
Permalink  
 

Derek... since the Koach has driver's side doors, does that mean they used Canadian bodies?

__________________


John D. - St. Louis Park, MN.

1965 El Camino - LT-1, 4L60e, 4wh discs, SC&C susp.
2013 F-150 Platinum - Twin Turbo 3.5

2018 Factory Five MkIV Roadster build thread


President

Status: Offline
Posts: 7328
Date:
Permalink  
 

Excellent detailing. Way to small and detailed for me to do. The "rotisserie", is that something special for modelers ? or a JD "repurposed' item...headscratch

I just noticed it has 5 stacks/carbs, not 4, on each side. In the pic with Eddy, the center carb is a different color. Was that a dummy just to fill the space better ?

Interesting that they moved the fuel rail from outside the stacks to in the center in the last 2 pics.

I'm still working on my "full scale" models...laughing


__________________

Mitch D.   River Falls, WI

Lifetime member of the "Cars apart Club"

1966 Chevelle SS 396 M20

1970 Chevelle SS 396 M20

1967 Camaro SS/RS 350 M20


2K+ Club

Status: Offline
Posts: 2791
Date:
Permalink  
 

The rotisserie is a piece made for modellers by Tamiya. It's a two-piece rig with two turntables. The one in the pic is for bodies, etc., and the spring tension is adjustable by the preload holes. The other is a flat-top rig with a zillion holes and notches for clamps, rods, pegs, whatever... It's neat. Keeps your hands free and out of the spray.
Don't know if the #3 carb is a dummy or not... But the carb array is the same L & R instead of "mirrored".


Turntable


__________________


John D. - St. Louis Park, MN.

1965 El Camino - LT-1, 4L60e, 4wh discs, SC&C susp.
2013 F-150 Platinum - Twin Turbo 3.5

2018 Factory Five MkIV Roadster build thread


Founding Member

Status: Offline
Posts: 2791
Date:
Permalink  
 

John D wrote:

Derek... since the Koach has driver's side doors, does that mean they used Canadian bodies?


 No, drivers doors were a feature of the "improved Ford" 26-27 models. They all had them. 


__________________

Derek Kiefer - Mantorville, MN

69 Malibu Pro-Touring stroker LS1-383/T56 - 69 SS396-325/3spd project


2K+ Club

Status: Offline
Posts: 2791
Date:
Permalink  
 

George Barris died today....

Long live the King... of the Kustomizers

__________________


John D. - St. Louis Park, MN.

1965 El Camino - LT-1, 4L60e, 4wh discs, SC&C susp.
2013 F-150 Platinum - Twin Turbo 3.5

2018 Factory Five MkIV Roadster build thread


2K+ Club

Status: Offline
Posts: 2791
Date:
Permalink  
 

Update...
(JD's brain is ? - too detail oriented?)

The rear/rearmost "death-ride" seat on the Koach is basically on some brackets hanging off the back of the car. From the pics of the prototype, and text descriptions (I'm guessing) they were made from 1/4 x 1-1/2 flat-stock, rolled and shaped. The seat itself was probably some 3/4" plywood with foam & the red velvet "whore's drawers" diamond-buttoned upholstering.
The kit has some really cludgy brackets... all wrong and about a scale inch thick. Just won't do. The supplied seat cushions were hollowed out on the back/undersides as well...

Took some .020 brass sheet, made some scale 1-1/2 strips, and built up a pair of new brackets.
A piece of .005 sheet styrene was glued to the back to cover the hollow, and simulate the real seats.


Attachments
__________________


John D. - St. Louis Park, MN.

1965 El Camino - LT-1, 4L60e, 4wh discs, SC&C susp.
2013 F-150 Platinum - Twin Turbo 3.5

2018 Factory Five MkIV Roadster build thread


President

Status: Offline
Posts: 7328
Date:
Permalink  
 

Lookin' good though, MR OCD..tiphat


__________________

Mitch D.   River Falls, WI

Lifetime member of the "Cars apart Club"

1966 Chevelle SS 396 M20

1970 Chevelle SS 396 M20

1967 Camaro SS/RS 350 M20


2K+ Club

Status: Offline
Posts: 2791
Date:
Permalink  
 

Been at it again...
Headlights. The originals are HUGE, and glazed on 3 sides. They're all wrong on the kit.
The supplied aren't much more than chromed plastic blobs, with a badly shaped hollow in the front. They supply a piece of clear for the "lens".

(If you're wondering how I removed the chrome from the parts... Easy Off oven cleaner in a little "Jello-shot" plastic cup. The chrome is actually aluminum, and the lye in the Easy Off eats it right off in about 5 minutes, and doesn't damage the plastic parts!)

This is my 1st go-around with making something presentable. I'm using the top & bottom finials (sawed off of the supplied), and cut some acrylic blocks. There's 3/32 brass angle on the corners. They're not as big as the prototypes though... but they fit in the footprint of the finials. (I really need a micro-lathe/jeweler's lathe... I could turn correct parts out of brass stock!)


Attachments
__________________


John D. - St. Louis Park, MN.

1965 El Camino - LT-1, 4L60e, 4wh discs, SC&C susp.
2013 F-150 Platinum - Twin Turbo 3.5

2018 Factory Five MkIV Roadster build thread


President

Status: Offline
Posts: 7328
Date:
Permalink  
 

They will look great, but you are now CAPTAIN OCD...notworthytiphat


__________________

Mitch D.   River Falls, WI

Lifetime member of the "Cars apart Club"

1966 Chevelle SS 396 M20

1970 Chevelle SS 396 M20

1967 Camaro SS/RS 350 M20


3K+ Club

Status: Offline
Posts: 4731
Date:
Permalink  
 

John have you thought about entering it in a model building contest?  For that much effort, it would be cool to know how it stacks up as well as give others an opportunity to see the fine work!


__________________

Stan S.-Twin Cities 'South Metro'

1972 Malibu Convertible 2nd time around 

2001 Mustang GT Convertible 

Forum influenced terms: 'Link Paste', 'Stanitized', & 'Revolving garage door...' 


2K+ Club

Status: Offline
Posts: 2791
Date:
Permalink  
 

I entered contests as a kid... back then I got bumped to the "adult" classes (cause the F'rs didn't believe that I'd built them), but I still used to place and occasionally win.
I'm pretty good, and the more I get back to building the skill-set gets better... but there are guys out there that are just friggin' incredible - makes my stuff look like it started as a "Snap-Together" kit.

I do it for the mental disconnect - throw a DVD in the shop player, and blot out the world except for the thing in front of you that's 1:25th as big as real.
(Half the battle of detailing out a marginal kit is figuring out what/how to do it, what materials can you re-purpose, then playing games with scale & texture to simulate something. That's the pleasure and challenge for me.)

Nah, no contests... Once they're built they go in a plastic display box on a shelf in my office.

__________________


John D. - St. Louis Park, MN.

1965 El Camino - LT-1, 4L60e, 4wh discs, SC&C susp.
2013 F-150 Platinum - Twin Turbo 3.5

2018 Factory Five MkIV Roadster build thread


2K+ Club

Status: Offline
Posts: 2444
Date:
Permalink  
 

Very nice JD. Why are you not a tool and die maker?

__________________

Kevin

Northwestern Ohio


2K+ Club

Status: Offline
Posts: 2791
Date:
Permalink  
 

T&D/machinist was my actual career intention out of High School. I was fortunate enough to attend a HS that had a huge Industrial Arts program, and did 4 years in the Machine Shop. Back then it was still all "manual" stuff, and CAD/CAM/CNC was in its infancy. All of the the machine tools were WWII-era, and you had to do MATH!!

90% of the fabrication skill-set I have comes from those days in Mr. Epley's machine shop classes. One of the tasks we would do for our grades was to make repair parts for our machines, the woodshop machines, and the print shop machines. Everything was war-era, so they were 40+ years old when we were on them. With the exception of the housings/castings, there wasn't anything we couldn't make... shafts, gears, spindles, bushings... anything - all by "hand" - no scanning, CAD, electronics. We used mic's & dial indicators, reverse-engineered the parts, scratched out our own working drawings, got a hunk of stock and carved.
I took an apprenticeship at a suburban Chicago shop - lasted 6 months before it drove me nearly bat-sh*t crazy. It was a shop that specialized in blow-molds for plastic bottles. If you used Ivory dish soap, Valvoline, or Prestone in 1983, I probably worked on the molds for the bottles. The shop wasn't a good "fit" for me, and an opportunity to move to Mpls (get out of Chi-Town!) and work for Audio King presented itself. I was 18 and had nothing to lose. The rest is history.

I've been building models since I was 6 years old. Something I've always enjoyed doing... there's something about replicating an object in miniature with as much detail as the original that appeals to me.


__________________


John D. - St. Louis Park, MN.

1965 El Camino - LT-1, 4L60e, 4wh discs, SC&C susp.
2013 F-150 Platinum - Twin Turbo 3.5

2018 Factory Five MkIV Roadster build thread


Vice President

Status: Offline
Posts: 234
Date:
Permalink  
 

John, how do you find the quality of the parts in current kits with those of years ago? Do you shop for kits in retail stores or do you prefer to look on-line? Do you have a scale you prefer?

As others have noted, you do real nice work!


__________________

Ron - Twin Cities

'66 Malibu


2K+ Club

Status: Offline
Posts: 2791
Date:
Permalink  
 

Quality probably depends on genre & subject matter...

I exclusively do model cars, and mostly "older" stuff (like 60's muscle, dragsters, stockers, etc), or am re-building kits I assembled as a kid... in 1:25/1:24 scale.
Most of the kit suppliers haven't issued a new kit of anything from the '60s in nearly 40 years. They're producing kits of the later model stuff - to cater to the modelers of today.

The "new" kits of the 60's stuff on the shelves today are re-releases of the old stuff with new box art. This is one of them Someone got hold of the molds and is doing production runs... Trouble is the molds are "tired" - the detail is not as sharp as it was when originally released. Some hobby shops have the "drool" cabinet, where original-issue/still sealed kits are available. The identical kit new is $23, the original 1st run kit is $100+!!

The guys that do military, aircraft, or ships are another breed. They demand high-end stuff, and the mfgs cater to that... even in 1:32 or 1:72 the detail is amazing.
I'm sure the new/new stuff is really good. Just the technology in CNC machining to make the molds would dictate better quality.

The high-end automotive kits (Japanese or German) that are in 1:8 or 1:12 are outstanding. Because of the size being larger, they can more accurately reproduce detail, and include more components for a sub-assembly, than molding a "blob" to represent something. Trouble is that these kits can start in the $145 range and go up.

I usually shop in stores. "Scale Model Supplies" in St. Paul is a fabulous "true" hobby shop. Hub Hobby in Richfield is a good place, but it's turning more & more into an RC and toy/craft store.


__________________


John D. - St. Louis Park, MN.

1965 El Camino - LT-1, 4L60e, 4wh discs, SC&C susp.
2013 F-150 Platinum - Twin Turbo 3.5

2018 Factory Five MkIV Roadster build thread


2K+ Club

Status: Offline
Posts: 2791
Date:
Permalink  
 

Been chipping away the last several nights - a few hours at a time...

Like the headlamps, the side-mounted coach lamps were "ok", but not right.
Why they didn't mold them in clear plastic is beyond me... the detail was really pretty good, but there's no way you could make them look like lamps with clear glass via paint. So, I recreated them in clear.

I found some stuff in the railroader section at Hub Hobby. One kit was two-part putty, that when squished together 1:1 will cure into a silicone rubber compound. You have about 5 minutes of working time before it starts reacting. I glued some scrap to the original (forming a pour spout and a vent), then encased it in the putty. About 20 minutes later it was hardened. Slicing along one edge I was able to free the original part from the mold.
The other kit was a two-part casting acrylic. Again a 1:1 mix, with about a 30 minute working time before it starts hardening. This stuff is usually used for encasing objects in a clear block - like an award, coin, etc. The problem with casting acrylics is when they're mixed, air is entrapped in the material creating bubbles. This stuff is viscous, and the bubbles won't work themselves out without help. Enter a process called vacuum de-gassing. (Many years ago when I was doing the LED's, I picked up a used vacuum pump, and made a small chamber. The intent was to possibly make my own lenses for the lights, but it never developed beyond the idea and the pump) I dug out the pump and chamber and de-gassed my mix, and poured it into the mold.
This stuff requires about 30 hours to harden enough to de-mold, and 7 days (!) to fully cure. After a few days I freed my 1st casting, set it aside, then poured #2. In a week or so I'll start cleaning up the castings, and polishing/painting when the material is fully hard.

The other project was the totally clunky side-steps. Again some plastic blobs with a little scroll-detail in them. Using some scrap PC board material (again from the LED era) I carved a slotted rectangle in the sizes needed for the 4 front, and 2 rear steps. Using some brass sheet cut in 5/64" strips, they were bent into rectangles and set in the groove. The next challenge was to bend 36 little loop-de-loops. Using some brass rod, I made a jig to bend them (more or less) identical. The next step will be to solder the loops into the frames.

(Yes, I am certifiably nutz cuckoo
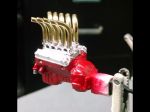
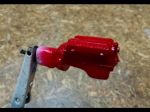
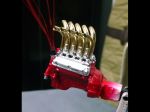
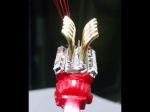
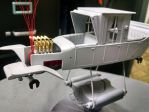
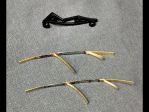
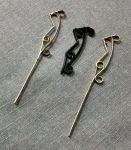
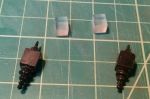
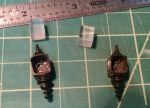
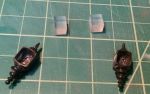
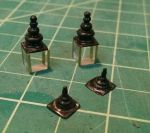
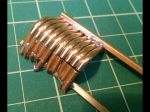
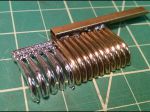
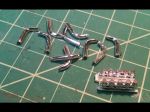
... but it's the challenge of building these parts that's the fun part for me razz)


Attachments
__________________


John D. - St. Louis Park, MN.

1965 El Camino - LT-1, 4L60e, 4wh discs, SC&C susp.
2013 F-150 Platinum - Twin Turbo 3.5

2018 Factory Five MkIV Roadster build thread


Vice President

Status: Offline
Posts: 234
Date:
Permalink  
 

. . . it's the challenge of building these parts that's the fun part for me

And you are certainly able to meet the challenge!!


__________________

Ron - Twin Cities

'66 Malibu


2K+ Club

Status: Offline
Posts: 2791
Date:
Permalink  
 

A few more pics of the completed steps - they'll be touched up when mounted.


Attachments
__________________


John D. - St. Louis Park, MN.

1965 El Camino - LT-1, 4L60e, 4wh discs, SC&C susp.
2013 F-150 Platinum - Twin Turbo 3.5

2018 Factory Five MkIV Roadster build thread


2K+ Club

Status: Offline
Posts: 2791
Date:
Permalink  
 

Some serious modelling skills...
(Pics from some of the FB threads I subscribe to)


Attachments
__________________


John D. - St. Louis Park, MN.

1965 El Camino - LT-1, 4L60e, 4wh discs, SC&C susp.
2013 F-150 Platinum - Twin Turbo 3.5

2018 Factory Five MkIV Roadster build thread


1K+ Club

Status: Offline
Posts: 1260
Date:
Permalink  
 

Amazing detail and talent on that ship. I love the bullet scene!  1815507?AWSAccessKeyId=1XXJBWHKN0QBQS6TGPG2&Expires=1450310400&Signature=IVNVQ8dXWqlaHt1teTebr1NmqIM%3D


__________________


'69 Convertible,  Lemans Blue, 454, 200 4R, 12 Bolt. 

Jon H.  Lino Lakes


Founding Member

Status: Offline
Posts: 2791
Date:
Permalink  
 

Looks like the charger still has all 12? of its wheelcovers. cool


__________________

Derek Kiefer - Mantorville, MN

69 Malibu Pro-Touring stroker LS1-383/T56 - 69 SS396-325/3spd project


2K+ Club

Status: Offline
Posts: 2791
Date:
Permalink  
 

About nearly to admit defeat with the side-mounted coach lamp project... I'm on round 8 or 9 with several different molds. Can't get a good casting.
(Some research reveals that casting very small parts with the stuff is difficult. There's not volume of material to self-generate enough heat for proper curing. They're recommending placing the filled mold in a 150deg oven for an hour after pouring. We'll give it a try.)

Changed gears.
Started getting some color on the Koach body! Sprayed the red interior areas of the body shell, masked, then sprayed the semi-gloss black areas of the roof & tonneau's. All of this will get masked off when the gloss black goes on the remainder.


Attachments
__________________


John D. - St. Louis Park, MN.

1965 El Camino - LT-1, 4L60e, 4wh discs, SC&C susp.
2013 F-150 Platinum - Twin Turbo 3.5

2018 Factory Five MkIV Roadster build thread


3K+ Club

Status: Offline
Posts: 4731
Date:
Permalink  
 

Found this going through pics from Car Craft 2014, and thought it might give you some motivation (not that you need any...).

3-21-15 241.jpg 


Attachments
__________________

Stan S.-Twin Cities 'South Metro'

1972 Malibu Convertible 2nd time around 

2001 Mustang GT Convertible 

Forum influenced terms: 'Link Paste', 'Stanitized', & 'Revolving garage door...' 


President

Status: Offline
Posts: 7328
Date:
Permalink  
 

Ah-ha, the 10 strombergs are fake !! They are sitting on a single 4 barrel carb on a tunnel ram...rolleyes

It would look better if it had dual quads and didn't leave the strombergs hanging in mid-air so badly.

Other than that, it IS pretty cool to see and the detail should inspire MR. OCD's creative determination.


__________________

Mitch D.   River Falls, WI

Lifetime member of the "Cars apart Club"

1966 Chevelle SS 396 M20

1970 Chevelle SS 396 M20

1967 Camaro SS/RS 350 M20


2K+ Club

Status: Offline
Posts: 2791
Date:
Permalink  
 

That particular vehicle is a "tribute car", not the original built by Barris... there's a few out there.

The pics I have in my posts are of the Barris car.


__________________


John D. - St. Louis Park, MN.

1965 El Camino - LT-1, 4L60e, 4wh discs, SC&C susp.
2013 F-150 Platinum - Twin Turbo 3.5

2018 Factory Five MkIV Roadster build thread


Founding Member

Status: Offline
Posts: 2791
Date:
Permalink  
 

That replica has '24-25 Model T body rather than '26-27

__________________

Derek Kiefer - Mantorville, MN

69 Malibu Pro-Touring stroker LS1-383/T56 - 69 SS396-325/3spd project


2K+ Club

Status: Offline
Posts: 2791
Date:
Permalink  
 

Shot some color on the body last night... now to mask off and spray the gold highlights/rolled beads on the fenders & nose... (ugh).


Attachments
__________________


John D. - St. Louis Park, MN.

1965 El Camino - LT-1, 4L60e, 4wh discs, SC&C susp.
2013 F-150 Platinum - Twin Turbo 3.5

2018 Factory Five MkIV Roadster build thread


2K+ Club

Status: Offline
Posts: 2791
Date:
Permalink  
 

Arrggg.... setback.

Shot the gloss black using Testor's "Model Master" acrylic enamel. Let it dry 2 days... didn't "fingernail", imprint, nothing - OK, good to go for next step.
Masked off the fenders, shot the gold/brass color (Testor's paint again) on the detail areas, and let dry for a day.

Unmasked everything and CRAP!

Did NOT turn out well.

Let's just say that the tape reacted/transferred to the black, the solvents in the gold crawled under the tape, reacted with the black basecoat, and the overall paint-job is basically fubar.

Basically I should have waited about 2-weeks on the black... total flash-off of any solvents, and complete cure.

I'm probably going to need a new body-shell and start over with this phase (you can't use "stripper" on plastic, and sanding it off would kill the molded-in detail).

__________________


John D. - St. Louis Park, MN.

1965 El Camino - LT-1, 4L60e, 4wh discs, SC&C susp.
2013 F-150 Platinum - Twin Turbo 3.5

2018 Factory Five MkIV Roadster build thread


Founding Member

Status: Offline
Posts: 2791
Date:
Permalink  
 

I have heard of using brake fluid to remove paint from model kits but have never tried it... might be worth trying on some scrap plastic first though.

__________________

Derek Kiefer - Mantorville, MN

69 Malibu Pro-Touring stroker LS1-383/T56 - 69 SS396-325/3spd project


2K+ Club

Status: Offline
Posts: 2791
Date:
Permalink  
 

Been a long while... finally got back to the Koach.

Well, I was lax on photo taking again. Got my head into the game and just wanted to get this project done.

Derek... on your prompt and others in the modelling community I tried the brake fluid thing. Had nothing to lose, and the stuff DOES eat paint off what it touches. After an hour or so with some and a Q-tip, I was able to remove the paint off the fenders without harm to the plastic! Got the fubar'd paint off, neutralized what was left with a good soap & water bath, and tried again. Reloaded the airbrush with gloss black and re-shot the fenders. Waited 3 days for cure.

Fender detail round #2: This time I tried Gold-tone "Bare Metal Foil" for the raised beads on the fenders.
Trust me, you just have to have your head in the right place to do this stuff (and NO caffeine!). It is truly like gold-leafing an art object... about 90% of what's applied winds up as scrap. After cutting a piece to cover the entire fender, sticking it down, burnishing with a Q-tip, running the edges/creases with a toothpick tip, burnishing again, then (SCARY) taking a brand-new #11 X-Acto blade and EVER SO GENTLY tracing the edges/outline...

Moment of truth. Unstick an edge of what will be removed and gently lift it off. Success!!
After removing everything but the rolled beads, another gentle burnishing to clean the edges, then a few shots of clear to seal everything in place.

After this minor triumph, it was all downhill. From here it was just assembly of all the sub-assemblies that were all ready test-fitted, done & waiting.


Attachments
__________________


John D. - St. Louis Park, MN.

1965 El Camino - LT-1, 4L60e, 4wh discs, SC&C susp.
2013 F-150 Platinum - Twin Turbo 3.5

2018 Factory Five MkIV Roadster build thread


President

Status: Offline
Posts: 7328
Date:
Permalink  
 

Way cool, John. Congrats on completing it to such a high level of accomplishment..notworthy


__________________

Mitch D.   River Falls, WI

Lifetime member of the "Cars apart Club"

1966 Chevelle SS 396 M20

1970 Chevelle SS 396 M20

1967 Camaro SS/RS 350 M20


1K+ Club

Status: Offline
Posts: 1260
Date:
Permalink  
 

Looking good!

__________________


'69 Convertible,  Lemans Blue, 454, 200 4R, 12 Bolt. 

Jon H.  Lino Lakes


Founding Member

Status: Offline
Posts: 2791
Date:
Permalink  
 

Cool! Glad to hear the brake fluid worked. thumbsup


__________________

Derek Kiefer - Mantorville, MN

69 Malibu Pro-Touring stroker LS1-383/T56 - 69 SS396-325/3spd project


2K+ Club

Status: Offline
Posts: 2791
Date:
Permalink  
 

Done with the scale stuff for awhile - cleaned up the "40 Watt Skunkworks" shop.

("Dashboard" Kevin visited the house one day, and I took him down to my basement workshop... where all the electronics, doodads, toys and model stuff is kept... He said something along the lines of "Oh, this is where you imagineer all that stuff... the JD Skunkworks! Name stuck)

Next project will be restoring/resto-modding my vintage 1960's "Orange Crush" illuminated wall clock.

I picked this up at a yard sale 10 years back, and had it in the 40 Watt before the remodel. Worked great for about a year - until the ancient plastic gears in the clock movement gave it up and started shedding teeth.


Attachments
__________________


John D. - St. Louis Park, MN.

1965 El Camino - LT-1, 4L60e, 4wh discs, SC&C susp.
2013 F-150 Platinum - Twin Turbo 3.5

2018 Factory Five MkIV Roadster build thread


2K+ Club

Status: Offline
Posts: 2444
Date:
Permalink  
 

Ghee's John you've compromised the JD Imaginneer development center. If you continue exposing sensitive information like this someones going to think you might be supporting what's her name. I like the clock!

__________________

Kevin

Northwestern Ohio


Secretary

Status: Offline
Posts: 2941
Date:
Permalink  
 

Derek69SS wrote:

I have heard of using brake fluid to remove paint from model kits but have never tried it... might be worth trying on some scrap plastic first though.


I have used it to soften the plastic too. Did a few junkyard cars long ago and it worked well. I still have a post-race stock car I did and used it sparingly to help crumple some "sheetmetal" 


__________________

Bryan-NW 'burbs
1972 Malibu
Vaguely stock appearing, and the opposite of restored.
1999 std bore 5.7, Vortec heads, Holley Stealth Ram, GM cam
700R4, Viking coilovers, 12 bolt 4.10 posi, and a whole bunch more


2K+ Club

Status: Offline
Posts: 2745
Date:
Permalink  
 

Another common way to strip paint from plastic is using 90% alcohol from a drug store or pharmacy. Some brands of Brake fluid can actually soften and ruin plastic and styrene.


__________________

Chris - Ramsey, MN.

Dear Optimist, Pessimist, and Realist.

While you guys were busy arguing about the glass of water. I drank it!

Sincerly,

The opportunist.

Page 1 of 1  sorted by
 
Quick Reply

Please log in to post quick replies.

Chatbox
Please log in to join the chat!